配置相关

配置注入实体类

  1. 编写实体类

    1
    2
    3
    4
    5
    6
    public class AppConfig {
    String appId;
    String apigwPublicKey;
    String priKey;
    String baseUrl;
    }
  2. 参数注入需要set方法,所以加上@Data注解

  3. 交由Spring管理当前对象,添加@Component注解

    或在启动类添加@EnableConfigurationProperties({实体类class})

  4. 设置前缀,添加@ConfigurationProperties(prefix = “app”)注解

  5. 在配置文件进行配置

    1
    2
    3
    4
    5
    app:
    appId: 123
    apigwPublicKey: 456
    priKey: 789
    baseUrl: 0
  6. 使用,在需要用到的类@Autowired AppConfig即可

配置提示

引入依赖

1
2
3
4
5
6
<!--自定义配置处理器-->
<dependency>
<groupId>org.springframework.boot</groupId>
<artifactId>spring-boot-configuration-processor</artifactId>
<optional>true</optional>
</dependency>

如果无效果,检查maven插件版本是否吻合,尝试install查看是否会报错

多配置切换

可同时定义多个配置文件,命名方式为“application-*.yml”,如
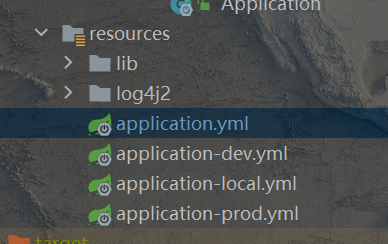
image-20230919085531459

  • 切换方法一:手动修改springboot配置文件

    在application.yml中配置

    1
    2
    3
    spring.profiles.active=dev
    # spring.profiles.active=local
    # spring.profiles.active=prod
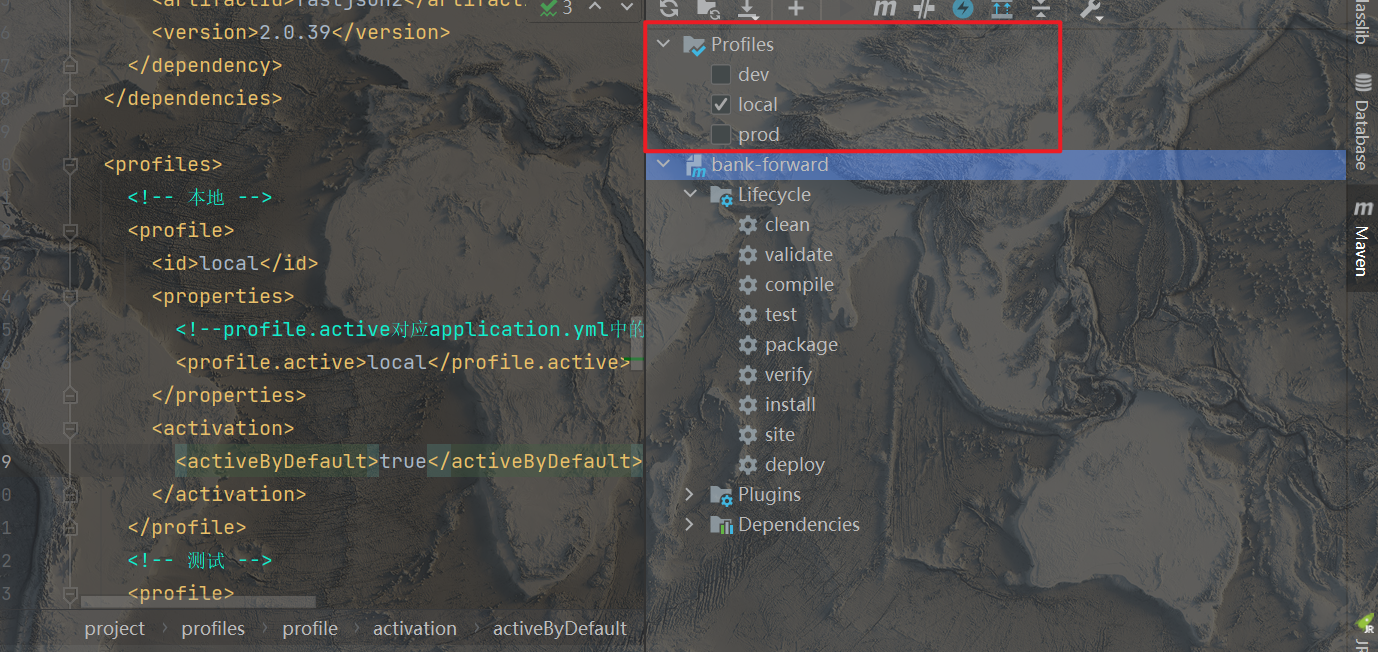
  • 切换方法二:maven配置(maven变量注入)

    maven在编译时可以动态决定当前编译环境

    application.yml中配置为:

    1
    2
    # @@中变量名可自定义,但要与下面的配置中标签相同
    spring.profiles.active=@profiles.active@

    maven中配置profiles内容

    1
    2
    3
    4
    5
    6
    7
    8
    9
    10
    11
    12
    13
    14
    15
    16
    17
    18
    19
    20
    21
    22
    23
    24
    25
    26
    27
    28
    29
    30
    <profiles>
    <!-- 本地 -->
    <profile>
    <id>local</id>
    <properties>
    <!--profile.active对应application.yml中的@profile.active@-->
    <profile.active>local</profile.active>
    </properties>
    <activation>
    <!-- 默认选择的配置 -->
    <activeByDefault>true</activeByDefault>
    </activation>
    </profile>
    <!-- 测试 -->
    <profile>
    <id>dev</id>
    <properties>
    <!--profile.active对应application.yml中的@profile.active@-->
    <profile.active>dev</profile.active>
    </properties>
    </profile>
    <!-- 正式 -->
    <profile>
    <id>prod</id>
    <properties>
    <!--profile.active对应application.yml中的@profile.active@-->
    <profile.active>prod</profile.active>
    </properties>
    </profile>
    </profiles>

    该配置会在maven工具中生成profile菜单,可进行勾选

    image-20230919091551764

    如果想要在编译时排除其他环境的配置,可以在pom中配置

    1
    2
    3
    4
    5
    6
    7
    8
    9
    10
    11
    12
    13
    14
    15
    16
    17
    18
    19
    20
    21
    22
    23
    24
    25
    <build>
    <resources>
    <!--排除配置文件-->
    <resource>
    <directory>src/main/resources</directory>
    <!--先排除所有的配置文件-->
    <excludes>
    <!--使用通配符,当然可以定义多个exclude标签进行排除-->
    <exclude>application*.yml</exclude>
    </excludes>
    </resource>

    <!--根据激活条件引入打包所需的配置和文件-->
    <resource>
    <directory>src/main/resources</directory>
    <!--引入所需环境的配置文件-->
    <filtering>true</filtering>
    <includes>
    <include>application.yml</include>
    <!--根据maven选择环境导入配置文件-->
    <include>application-${profile.active}.yml</include>
    </includes>
    </resource>
    </resources>
    </build>

配置文件优先级

覆盖

对于key不同,则直接生效;

对于key相同的同名配置项,后加载会覆盖掉前加载,故而最终为后加载的配置项生效

本地配置

  • 同文件名配置 *.yaml 加载先于 *.properties
  • bootstrap配置 加载先于 application配置
  • 不带profile的配置 加载先于 带profile的配置

  1. bootstrap.yaml
  2. bootstrap.properties
  3. bootstrap-{profile}.yaml
  4. bootstrap-{profile}.properties
  5. application.yaml
  6. application.properties
  7. application-{profile}.yaml
  8. application-{profile}.properties

nacos配置

  • 本地配置 加载先于 nacos配置中心
  • nacos配置中心上共享配置(见下说明) 加载先于 nacos配置中心该服务配置(见下说明)
  • 不带profile的配置 加载先于 带profile的配置
  • nacos配置中心因需要通过data ID指定(或者通过spring.cloud.nacos.config.file-extension指定后缀),所以对于Nacos配置中心上的某个Data ID而言,不会存在既加载其*.yaml又加载其*.properties的情形。

  1. 本地配置
  2. nacos配置中心共享配置(通过spring.cloud.nacos.config.shared-configs指定)
  3. Nacos配置中心该服务配置(通过spring.cloud.nacos.config.prefix和spring.cloud.nacos.config.file-extension指定)
  4. Nacos配置中心该服务-{profile}配置(通过spring.cloud.nacos.config.prefix和spring.cloud.nacos.config.file-extension、以及spring.profiles.active指定)

controller 请求参数注入命名转换

参考资料 springboot项目配置参数请求及返回均为下划线方式_springboot responsebody 指定返回的格式 为下划线分割_偶系渣渣灰的博客-CSDN博客

在配置文件中添加配置

1
2
3
spring:
jackson:
property-naming-strategy: SNAKE_CASE #下划线参数

CamelCase策略,Java对象属性:personId,序列化后属性:persionId

PascalCase策略,Java对象属性:personId,序列化后属性:PersonId

SnakeCase策略,Java对象属性:personId,序列化后属性:person_id

KebabCase策略,Java对象属性:personId,序列化后属性:person-id

SpringBoot与Spring的关系

Spring Boot 为Spring的扩展封装,免去了很多配置,使得使用spring更加便捷

SpringAOP

AOP 要达到的效果是,保证开发者不修改源代码的前提下,去为系统中的业务组件添加某种通用功能。比如添加日志等。AOP 的本质是由 AOP 框架修改业务组件的多个方法的源代码,AOP是代理模式的典型应用。

SpringIOC

Spring来控制对象的生命周期
DI:依赖注入,spring依赖注入,不用关心具体的实现,比如日志有多个框架,我们只需要知道spring会给我们提供,不需要了解底层用的哪个框架

SpringBoot自动装配原理

  • @SpringBootApplication注解中引入了@EnableAutoConfiguration注解
  • @EnableAutoConfiguration注解中引入了@Import注解
  • @Import注解引入了一个deferredImportSelector对象,其功能为在springboot启动完成之后再引入,方便覆盖时判断如conditionOnBean
  • 找到META-INF/spring.factories配置文件
  • 过滤出所有的AutoConfiguration类
  • 通过@Condition排除无效自动配置类

这些自动配置类都是以AutoConfiguration结尾来命名的,它实际上就是一个JavaConfig形式的Spring容器配置类,通过@Bean导入到Spring容器中,以Properties结尾命名的类是和配置文件进行绑定的。它能通过这些以Properties结尾命名的类中取得在全局配置文件中配置的属性,我们可以通过修改配置文件对应的属性来修改自动配置的默认值,来完成自定义配置

SpringBoot版本

  • 版本号

Spring Boot 的版本号由 3 位组成,这里还是以上边两个版本为例,如下图:

img

  • 主版本:有可能进行大的架构调整,各大版本之间并不一定兼容

  • 次版本:在主版本架构不变的前提下,增加了一些新的特性或变化

  • 增量版本:bug 修复,细节的完善,用来描增量版本的,不一定是数字,例如:3.0.0-SNAPSHOT

  • 发布状态

发布状态也有很多同行人称为发布计划,常见的有以下几个:

  • GA:General Availability,正式发布的版本,官方推荐使用该版本,国外很多项目都是使用GA来表示正式发布版本的

  • PRE:预览版,主要是用来内部开发人员和测试人员测试使用,因此不建议使用

  • SNAPSHOT:快照版,可以稳定使用,且该版本会一直进行小量的优化和改进

  • RC:Release,该版本已经相当成熟了,基本上不存在导致错误的BUG,与即将发行的正式版相差无几。

RestFul接口规范

RESTful的特点: a. 每个互联网资源都有一个唯一的URI地址; b. 通过操作资源的表现形式来操作资源; c. 一般情况下使用JSON格式来表示具体的数据; c. 使用HTTP协议进行客户端与服务端之间的交互,从客户端到服务端的每个请求都必须包含理解请求所必需的信息; d. 客户端使用GET、POST、PUT(patch)、DELETE 4个表示操作方式的动词对服务端资源进行“状态”操作。

  • 命名必须全部小写
  • 资源(resource)的命名必须是名词,并且必须是复数形式
  • 如果要使用连字符,建议使用‘ - ’而不是‘ _ ’,‘ _ ’字符可能会在某些浏览器或屏幕中被部分遮挡或完全隐藏
  • 易读

常用注解

启动注解

  • @SpringBootApplication
    • 启动类注解
    • 包含@SpringBootConfiguration,@EnableAutoConfiguration,@ComponentScan
  • @SpringBootConfiguration
    • 继承@Configuration,标注当前类为配置类,会将当前类中声明的一个或多个以@Bean注解标记的方法纳入spring容器中,且实例名就是方法名
  • @EnableAutoConfiguration
    • 将当前所有符合条件的配置都加载到当前SpringBoot创建并使用IOC容器。
  • @ComponentScan
    • 自动扫描并加载符合条件的组件或bean定义,最终将改些bean加载到容器中
    • 可以通过basePackages等属性指定@ComponentScan自动扫描的范围,如果不指定,则默认Spring框架实现从声明@ComponentScan所在类的package进行扫描,默认情况下是不指定的,所以SpringBoot的启动类最好放在root package下。

Controller相关注解

  • @Controller
    • 控制器,处理HTTP请求
  • @RestController
    • 将方法返回的对象直接在浏览器上展示成json格式
  • @RequestBody
    • 通过HttpMessageConverter读取Request Body并反序列化为Object(泛指)对象
  • @RequestMapping
    • 会将 HTTP 请求映射到 MVC 和 REST 控制器的处理方法上
  • @GetMapping / @PostMapping
    • 将HTTP get / post请求映射到特定处理

取请求参数值

  • PathVariable
1
2
3
4
5
6
7
8
9
10
@Controller
@RequestMapping("/User")
public class HelloWorldController {

@RequestMapping("/getUser/{uid}")
public String getUser(@PathVariable("uid")Integer id, Model model) {
System.out.println("id:"+id);
return "user";
}
}
  • RequestParam
1
2
3
4
5
@RequestMapping("/getUser")
public String getUser(@RequestParam("uid")Integer id, Model model) {
System.out.println("id:"+id);
return "user";
}
  • @RequestHeader 把Request请求header部分的值绑定到方法的参数上
  • @CookieValue 把Request header中关于cookie的值绑定到方法的参数上

SpringBoot 核心功能

1
java -jar xx.jar
  • 使用嵌入式的Servlet容器,应用无需打成war包

  • 大量自动配置,简化开发,可修改默认配置

  • 提供starter简化Maven配置。Springboot提供了一系列的start pom用来简化maven依赖。如:常用的spring-boot-starter-web、spring-boot-starter-tomcat、spring-boot-starter-actuator

  • 准生产环境的运行时应用监控

  • 自动配置spring,Springboot会根据我们项目中类路径的jar包,为jar包的类进行自动装配bean。

  • 应用监控。springboot提供了基于HTTP、ssh、telnet对运行时的项目进行监控。springboot提供了actuator组 件,只需要在配置中加入spring-boot-starter-actuator依赖,通过继承AbstractHealthIndicator这个抽象类, 然后在doHealthCheck()方法中检测服务健康的方法,就可以实现一个简单的监控。

idea构建spring boot 项目

  • 脚手架使用阿里的,速度会快一点
  • 记得配置maven的镜像,不然下载很慢
    • 如无配置,可新建一个settings.xml

pom文件

管理依赖

启动类

一个普通的Java程序需要有一个入口,一般是某个类中的main方法。我们启动程序,就是运行这个 main方法。SpringBoot的主程序也就是整个项目的入口,同样会有一个main方法。SpringBoot项目就是从主程 序开始运行的。下图是一个实际项目中的主程序,对于SpringBoot程序来说,必须要用@SpringBootApplication 来标识启动类。其他的注解都是实际项目中为了实现其他的功能而添加的。

配置文件

  • application.properties

  • application.yml

配置文件的作用

  • 修改SpringBoot自动配置的默认值 SpringBoot的底层把我们的常用配置都给我们配置好了,一般来说我们不需要去调整大部分的配置,直接使 用默认的配置就好。这也是SpringBoot“习惯大于配置”的思想。但有的时候默认值不符合我们项目的要求, 这个时候我们就可以通过配置文件来修改这些默认值

  • 为程序添加变量

    有的时候我们不会把所有的变量都写死在代码中,有些东西是会经常发生变化,或者不同环境的值不同。比如 对接系统接口的地址、数据库的连接信息等等。这个时候我们就可以将这些内容写在配置文件中,程序在使用 的时候,可以去读取配置文件中的值。

profile

Profile是Spring对不同环境提供不同配置功能的支持,可以通过激活、指定参数等方式快速切换环境 多profile文件形式: – 格式:application-{profile}.properties/yml: • application-dev.properties、application-prod.properties
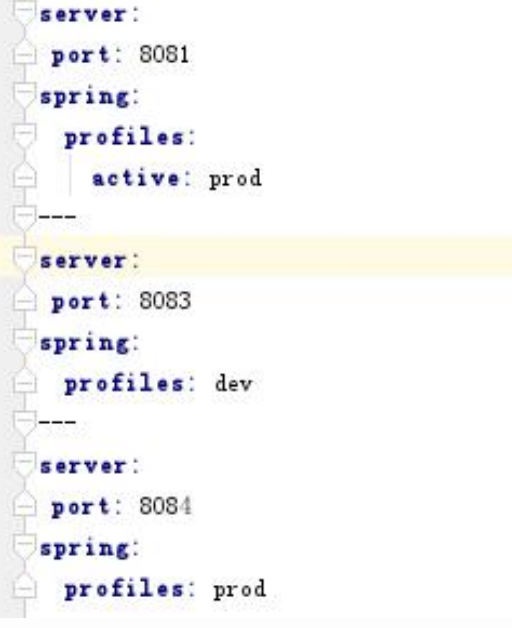
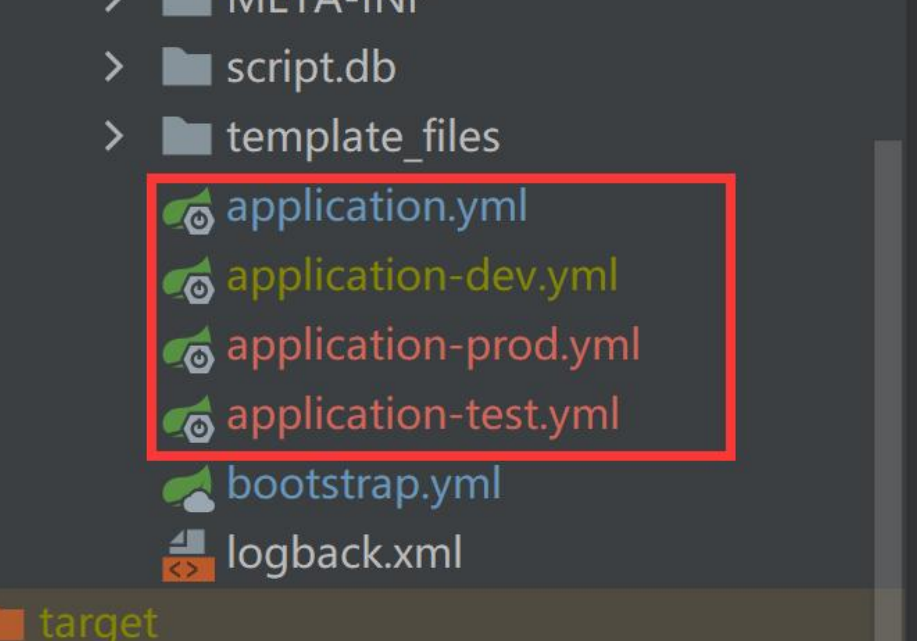
image-20220726141103607
image-20220726141107171

入门案例

  1. 搭建一个spring boot 工程并开发几个简单的接口

    a. GET: 接口传入id参数,后端返回id*100后的结果

    1
    2
    3
    4
    5
    6
    7
    8
    9
    10
    11
    /**
    * GET: 接口传入id参数,后端返回id*100后的结果
    * @param id
    * @return
    */
    @GetMapping("/id-plus-100")
    public String getIdPlus100(
    @RequestParam("id") Integer id
    ){
    return String.valueOf(id*100);
    }
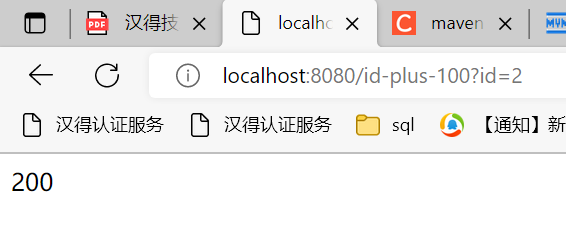
    image-20220727110928377

    b. POST:接口传入{name: ”张三” ,sex: “男” ,age: “18”},后端返回“张三,男性,18周岁”

    1
    2
    3
    4
    5
    6
    7
    8
    9
    10
    11
    12
    13
    14
    15
    /**
    * POST:接口传入{name: ”张三” ,sex: “男” ,age: “18”},后端返回“张三,男性,18周岁”
    * @param name
    * @param sex
    * @param age
    * @return
    */
    @PostMapping("/user")
    public String postUser(
    @RequestParam("name") String name,
    @RequestParam("sex") String sex,
    @RequestParam("age") Integer age
    ){
    return String.valueOf(name+","+sex+"性"+","+age+"周岁");
    }
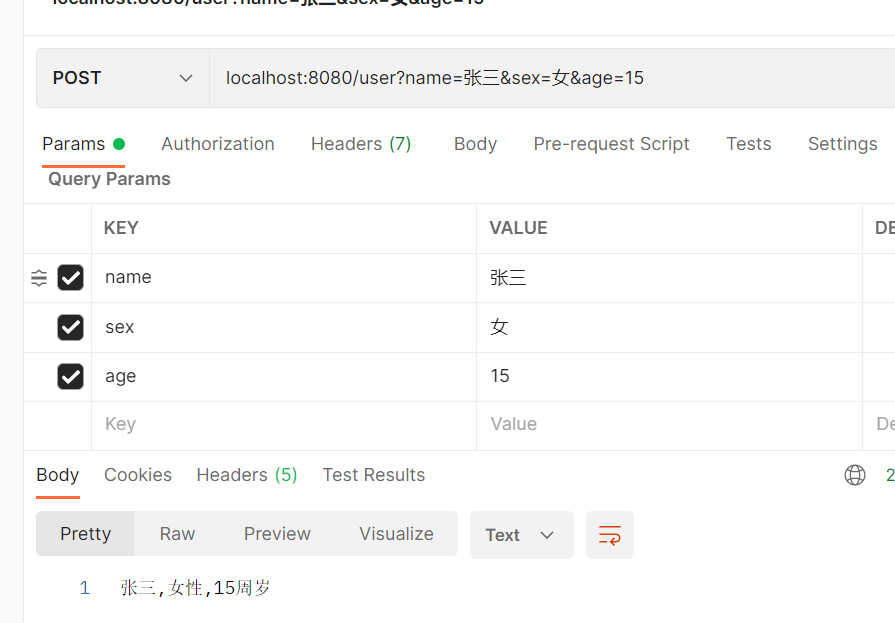
    image-20220727132453943

    c. PUT:接口传入{name: ”张三” ,sex: “男” ,age: “18”} ,后端返回{name: ”张三” ,sex: “男” ,age: “18” , mark: “已成年”}

    1
    2
    3
    4
    5
    6
    7
    8
    9
    10
    11
    12
    13
    14
    15
    16
    17
    18
    19
    20
    21
    22
    23
    24
    25
    26
    27
    28
    29
    30
    31
    /**
    * PUT:接口传入{name:”张三”,sex:“男”,age:“18”} ,后端返回{name:”张三”,sex:“男”,age:“18”, mark:“已成年”}
    * @param name
    * @param sex
    * @param age
    * @return
    */

    @PutMapping("/user-mark")
    public String putUserMark(
    @RequestParam("name") String name,
    @RequestParam("sex") String sex,
    @RequestParam("age") Integer age
    ){
    StringBuilder sb = new StringBuilder();
    sb.append("{");
    sb.append("name:”");
    sb.append(name);
    sb.append("”,sex:“");
    sb.append(sex);
    sb.append("“,age:“");
    sb.append(age);
    sb.append("“, mark:“");
    if(age >= 18){
    sb.append("已成年”}");
    }else {
    sb.append("未成年”}");
    }

    return String.valueOf(sb);
    }
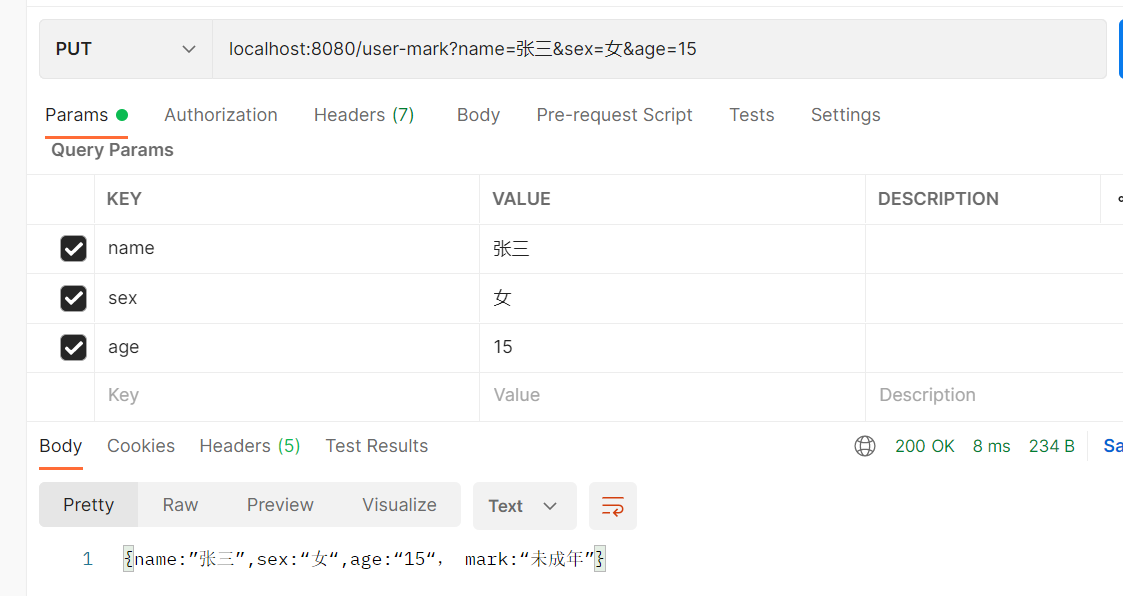
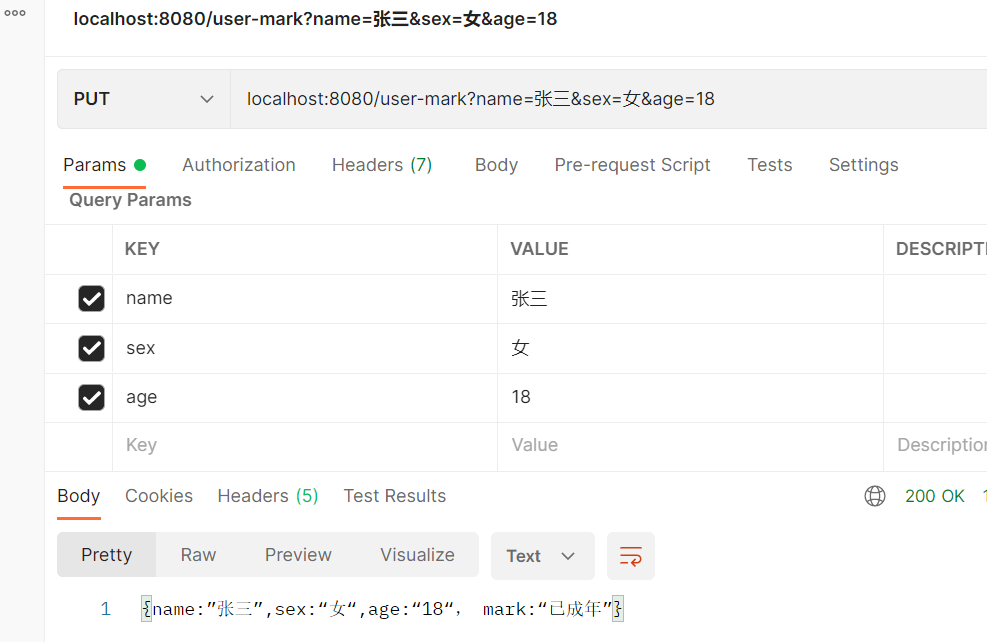
    image-20220727132610673

    image-20220727132613577

    d. DELETE: 接口传入{name: ”张三” ,sex: “男” ,age: “18”} ,后端返回, “张三信息已删除“

    1
    2
    3
    4
    5
    6
    7
    8
    9
    10
    11
    12
    13
    14
    15
    /**
    * DELETE: 接口传入{name: ”张三” ,sex: “男” ,age: “18”} ,后端返回, “张三信息已删除“
    * @param name
    * @param sex
    * @param age
    * @return
    */
    @DeleteMapping("/user")
    public String deleteUser(
    @RequestParam("name") String name,
    @RequestParam("sex") String sex,
    @RequestParam("age") Integer age
    ){
    return String.valueOf(name+"信息已删除");
    }
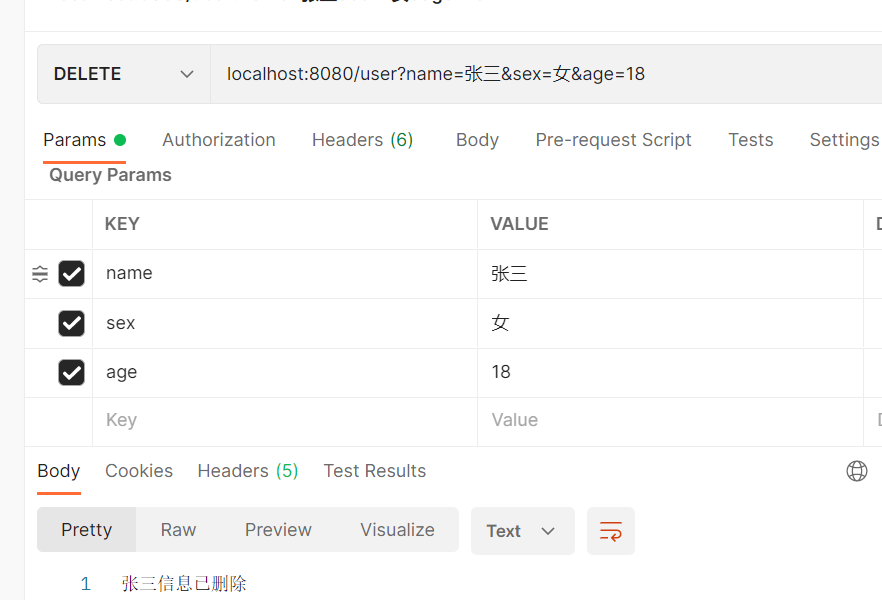
    image-20220727132715184

一个案例

引入依赖

1
2
3
4
5
6
7
8
9
10
11
12
13
14
<dependency>
<groupId>org.springframework.boot</groupId>
<artifactId>spring-boot-starter-web</artifactId>
</dependency>
<dependency>
<groupId>org.springframework.boot</groupId>
<artifactId>spring-boot-starter-thymeleaf</artifactId>
</dependency>
<dependency>
<groupId>org.springframework.boot</groupId>
<artifactId>spring-boot-devtools</artifactId>
<scope>runtime</scope>
<optional>true</optional>
</dependency>

Student表的增删改查

1
2
3
4
5
6
7
8
9
10
11
12
13
14
15
16
17
18
19
20
21
22
23
24
25
26
27
28
29
30
31
32
33
34
35
36
37
38
39
40
41
42
43
44
45
46
47
48
49
50
51
52
53
54
55
56
57
58
59
60
61
62
63
64
65
66
67
68
69
70
71
72
73
74
75
76
77
78
79
80
81
82
83
84
85
86
87
88
89
90
91
92
93
94
95
96
97
98
99
100
101
102
103
104
105
106
107
108
109
110
111
112
113
114
115
116
117
118
119
120
121
122
123
124
125
126
127
128
129
130
131
132
133
134
135
136
137
138
139
140
141
142
143
144
145
146
147
148
149
150
151
152
153
154
155
156
157
158
159
160
161
162
163
164
165
166
167
168
169
170
171
package com.example.firstdemo.api.controller;

import com.example.firstdemo.app.servive.HandStudentService;
import com.example.firstdemo.domain.entity.HandStudent;
import com.example.firstdemo.infra.util.Utils;
import org.springframework.beans.factory.annotation.Autowired;
import org.springframework.stereotype.Controller;
import org.springframework.ui.Model;
import org.springframework.web.bind.annotation.*;

import java.util.ArrayList;
import java.util.List;

@Controller
public class ListController {
@Autowired
HandStudentService handStudentService;

/**
* 若传入了学号,则按照学号查询,否则查询所有学生信息
*
* @param studentNo
* @param model
* @return
*/
@GetMapping("/hello/student")
public String helloStudent(
@RequestParam(value = "studentNo", required = false) String studentNo,
Model model
) {
List<HandStudent> studentList = new ArrayList<>();
if (studentNo != null) {
HandStudent s = handStudentService.selectByStudentNo(studentNo);
studentList.add(s);
} else {
studentList = handStudentService.selectAll();
}
model.addAttribute("studentList", studentList);

return "list";
}

/**
* 新增学生信息
*
* @param studentName
* @param studentAge
* @param studentGender
* @param model
* @return
*/
@PostMapping("/hello/student")
public String insertStudent(
@RequestParam("studentName") String studentName,
@RequestParam("studentAge") String studentAge,
@RequestParam("studentGender") String studentGender,
Model model

) {
// 查出当前最大学号
String maxNo = handStudentService.selectMaxNo();
Integer maxNoNum = Integer.valueOf(maxNo.substring(1));
// 生成学号
// 学号+1并转为字符串
String newNoStr = String.valueOf(maxNoNum + 1);
// 左边填充0得到三位学号
for (int i = 0; i < 3 - (newNoStr).length(); i++) {
newNoStr = "0" + newNoStr;
}
String newNo = "s" + newNoStr;
// 插入数据
try {
HandStudent handStudent = new HandStudent();
handStudent.setStudentNo(newNo);
handStudent.setStudentName(studentName);
handStudent.setStudentAge(Integer.valueOf(studentAge));
handStudent.setStudentGender(studentGender);
handStudentService.insertHandStudent(handStudent);
model.addAttribute("insert_msg", "添加成功");
} catch (Exception e) {
model.addAttribute("insert_msg", "添加失败");
}


// 返回插入的数据
HandStudent s = handStudentService.selectByStudentNo(newNo);
model.addAttribute("student", s);
return "list";
}

/**
* 修改学生信息
*
* @param studentNo
* @param studentName
* @param studentAge
* @param studentGender
* @param model
* @return
*/
@PutMapping("/hello/student")
public String updateStudent(
@RequestParam("studentNo") String studentNo,
@RequestParam("studentName") String studentName,
@RequestParam("studentAge") String studentAge,
@RequestParam("studentGender") String studentGender,
Model model

) {
// 学号是否为空判断
if (!Utils.isNotEmptyStr(studentNo)) {
model.addAttribute("update_msg", "修改失败,学号不能为空");
return "list";
}
// 修改数据
try {
HandStudent handStudent = new HandStudent();
if (Utils.isNotEmptyStr(studentName)) {
handStudent.setStudentName(studentName);
}
handStudent.setStudentNo(studentNo);
if (Utils.isNotEmptyStr(studentAge)) {
handStudent.setStudentAge(Integer.valueOf(studentAge));
}
if (Utils.isNotEmptyStr(studentGender)) {
handStudent.setStudentGender(studentGender);
}

handStudentService.updateByStudentNo(handStudent);
model.addAttribute("update_msg", "修改成功");
} catch (Exception e) {
model.addAttribute("update_msg", "修改失败");
}


// 返回修改的数据
HandStudent s = handStudentService.selectByStudentNo(studentNo);
model.addAttribute("student", s);
return "list";
}

/**
* 删除学生信息
*
* @param studentNo
* @param model
* @return
*/
@DeleteMapping("/hello/student")
public String deleteStudent(
@RequestParam("studentNo") String studentNo,
Model model

) {
// 返回修改的数据
HandStudent s = handStudentService.selectByStudentNo(studentNo);
model.addAttribute("student", s);
// 修改数据
try {

handStudentService.deleteByStudentNo(studentNo);
model.addAttribute("delete_msg", "删除成功");
} catch (Exception e) {
model.addAttribute("delete_msg", "删除失败");
}


return "list";
}
}

1
2
3
4
5
6
7
8
9
10
11
12
13
14
15
16
17
18
19
20
21
22
23
24
25
26
27
28
29
30
31
32
33
34
35
36
37
38
39
40
41
42
43
44
45
46
47
48
49
50
51
52
53
54
55
56
57
58
59
60
61
62
63
64
65
66
67
68
69
70
71
72
73
74
75
76
77
78
79
80
81
82
83
84
85
86
87
88
89
90
91
92
93
94
95
96
97
98
99
100
101
102
103
104
105
<!DOCTYPE html>
<html lang="en" xmlns:th="http://www.thymeleaf.org">
<head>
<meta charset="UTF-8">
<style>
table {
width: 100%;
border-collapse: collapse;
}

table caption {
font-size: 2em;
font-weight: bold;
margin: 1em 0;
}

th, td {
border: 1px solid #999;
text-align: center;
padding: 20px 0;
}

table thead tr {
background-color: #008c8c;
color: #fff;
}

table tbody tr:nth-child(odd) {
background-color: #eee;
}

table tbody tr:hover {
background-color: #ccc;
}


table tfoot tr td {
text-align: right;
padding-right: 20px;
}
</style>
</head>
<body>
<h1>查询</h1>
<form action="/hello/student" method="get">
学号:<br>
<input type="text" name="studentNo"> <br>
<input type="submit">
</form>
<table>
<thead>
<td>学号</td>
<td>姓名</td>
<td>年龄</td>
<td>性别</td>
</thead>
<tbody>

<tr th:each="student:${studentList}">
<td th:text="${student.getStudentNo()}"/>
<td th:text="${student.getStudentName()}"/>
<td th:text="${student.getStudentAge()}"/>
<td th:text="${student.getStudentGender()}"/>
</tr>
</tbody>

</table>


<h1>新增</h1>
<h2 th:text="${insert_msg}"></h2>
<form action="/hello/student" method="post">
姓名:<br>
<input type="text" name="studentName"><br>
年龄:<br>
<input type="text" oninput="this.value = this.value.replace(/[^0-9]/g, '');" name="studentAge"> <br>
性别:<br>
<input type="text" name="studentGender"> <br>
<input type="submit">
</form>
<h1>修改</h1>
<h2 th:text="${update_msg}"></h2>
<form action="/hello/student" method="post">
<input type="hidden" name="_method" value="put"/>
学号:<br>
<input type="text" name="studentNo"><br>
姓名:<br>
<input type="text" name="studentName"><br>
年龄:<br>
<input type="text" oninput="this.value = this.value.replace(/[^0-9]/g, '');" name="studentAge"> <br>
性别:<br>
<input type="text" name="studentGender"> <br>
<input type="submit">
</form>
<h1>删除</h1>
<h2 th:text="${delete_msg}"></h2>
<form action="/hello/student" method="post">
<input type="hidden" name="_method" value="delete"/>
学号:<br>
<input type="text" name="studentNo"> <br>
<input type="submit">
</form>

</body>
</html>

ajax

1
2
3
4
5
6
7
8
9
10
11
12
13
14
15
16
17
18
19
20
<!DOCTYPE html>
<html lang="en">
<head>
<meta charset="UTF-8">
<script src="https://code.jquery.com/jquery-3.1.1.min.js"></script>
<script type="text/javascript" src="/static/js/main.js"></script>
<title>Title</title>
</head>
<body>
<form id="update-student-core">
学号:<br>
<input type="text" name="studentNo" id="studentNo"><br>
课程号:<br>
<input type="text" name="courseNo" id="courseNo"><br>
成绩:<br>
<input type="number" name="core" id="core" value=""><br>
<input type="submit">
</form>
</body>
</html>
1
2
3
4
5
6
7
8
9
10
11
12
13
14
15
16
17
18
19
20
21
22
23
24
25
26
27
28
29
30
31
$(document).ready(function () {
// 文档页面加载完成之后
$("#update-student-core").submit(function (event) {
//stop submit the form, we will post it manually.
event.preventDefault();
fire_ajax_submit();
});

});
function fire_ajax_submit() {
var coreObj = {}
coreObj["studentNo"] = $("#studentNo").val();
coreObj["courseNo"] = $("#courseNo").val();
coreObj["core"] = $("#core").val();

$.ajax({
type: "PUT",
contentType: "application/json",
url: "/hello/student/core",
data: JSON.stringify(coreObj),
dataType: 'json',
cache: false,
timeout: 600000,
success: function (data) {
// alert(data.core);
$("#core").prop("value",data.core)
}
});
}


1
2
3
4
5
6
7
8
9
10
11
12
13
14
15
16
17
18
19
20
21
22
23
24

@Controller
public class ajaxController {
@Autowired
HandStudentCoreService handStudentCoreService;
@ResponseBody
@PutMapping("/hello/student/core")
public HandStudentCore helloStudentCore(
@RequestBody HandStudentCore handStudentCore
) {
HandStudentCore handStudentCoreRes = handStudentCoreService.selectByStudentNoAndCourseNo(handStudentCore.getStudentNo(), handStudentCore.getCourseNo());
return handStudentCoreRes;
}

@GetMapping("/hello/student/core")
public String helloStudent(
Model model
) {
return "ajax_study";
}


}

restful风格的前端请求

  • spring boot 默认关闭了隐藏方法过滤器,使得前端 form 无法发送 put 或者 delete 请求,需要在 yml 中开启
    * spring:
    *   mvc:
    *     hiddenmethod:
    *       filter:
    *         enabled: true
    
    1
    2
    3
    4
    5
    6
    7
    8
    9
    10
    11
    12
    13
    14
    15
    16
    17
    18
    19
    20
    21
    22
    23
    24
    25
    26
    27
    28
    29
    30

    # required=false

    某些请求参数不一定会传入,为了防止400错误,可使用 required = false来设置该参数

    ![image-20220728165405845](springboot/image-20220728165405845.png)

    # thymeleaf非空判断

    thymeleaf中如果要从一个对象中获取属性,但对象有可能为null,可使用问号进行非空判断![image-20220728165512917](springboot/image-20220728165512917.png)

    # ajax

    - ```js
    $.ajax({
    type: "POST", // 发送的请求类型
    contentType: "application/json", // 发送给服务器的编码类型
    url: "/hello/student/core", // 请求地址
    data: JSON.stringify(coreObj), // 发送的数据,这里使用JSON.stringify将一个对象转为JSON格式
    dataType: 'json',//服务器返回的数据类型
    cache: false,
    timeout: 600000, // 超时毫秒
    success: function (data) { // 请求成功后调用的函数
    alert("插入成功");
    // $("#core").prop("value",data.core)
    },
    error: function (){ // 请求失败调用的函数
    alert("插入失败");
    }
    })

MultipartFile设置文件的大小

1
2
3
4
5
6
//spring boot进行了集成,需要进行文件大小的设置
spring:
servlet:
multipart:
max-file-size: 50MB
max-request-size: 50MB

邮件发送

使用spring-boot-starter-mail

1
2
3
4
5
6
7
8
9
10
11
12
13
14
15
16
17
18
19
20
21
22
23
24
25
26
27
mail:
#配置smtp服务主机地址
host: smtp.mxhichina.com
#发送者邮箱
username: test@test.cn
#配置密码或者授权码
password:
#端口号465或587
port: 465
#默认的邮件编码为UTF-8
default-encoding: UTF-8
#其他参数
properties:
mail:
#配置SSL 加密工厂
smtp:
//账号信息认证
auth: true
#starttls:
#enable: true
ssl:
#本地测试,先放开ssl
enable: true
required: true
auth: true
#开启debug模式,这样邮件发送过程的日志会在控制台打印出来,方便排查错误
debug: true

SpringBoot直接运行原理

  • 打包的时候执行插件:spring-boot-maven-plugin

  • 打包后会生成一个Far Jar,其中包含了应用依赖的jar包和SpringBootLoader相关的类

  • java -jar时查看jar包中的manifest.mf文件,其中指定了java运行主类MainClass与Spring运行主类StartClass

  • jar包中指定的主类是JarLauncher,其会创建一个ClassLoader来动态加载jar包中boot-lib下的jar包,并新开一个线程执行指定的StarClass中的main函数

这里其实想到了shade插件,shade插件的原理是将依赖的jar包解包之后直接包入成品jar包中,而不像springboot动态的去加载jar包。

SpringBoot连接数配置

1
2
3
4
5
6
7
8
9
10
11
server:
tomcat:
threads:
# 最少(常驻)线程数
min-spare: 10
# 最多线程数
max: 20
# 最大连接数
max-connections: 30
# 最大等待数
accept-count: 10

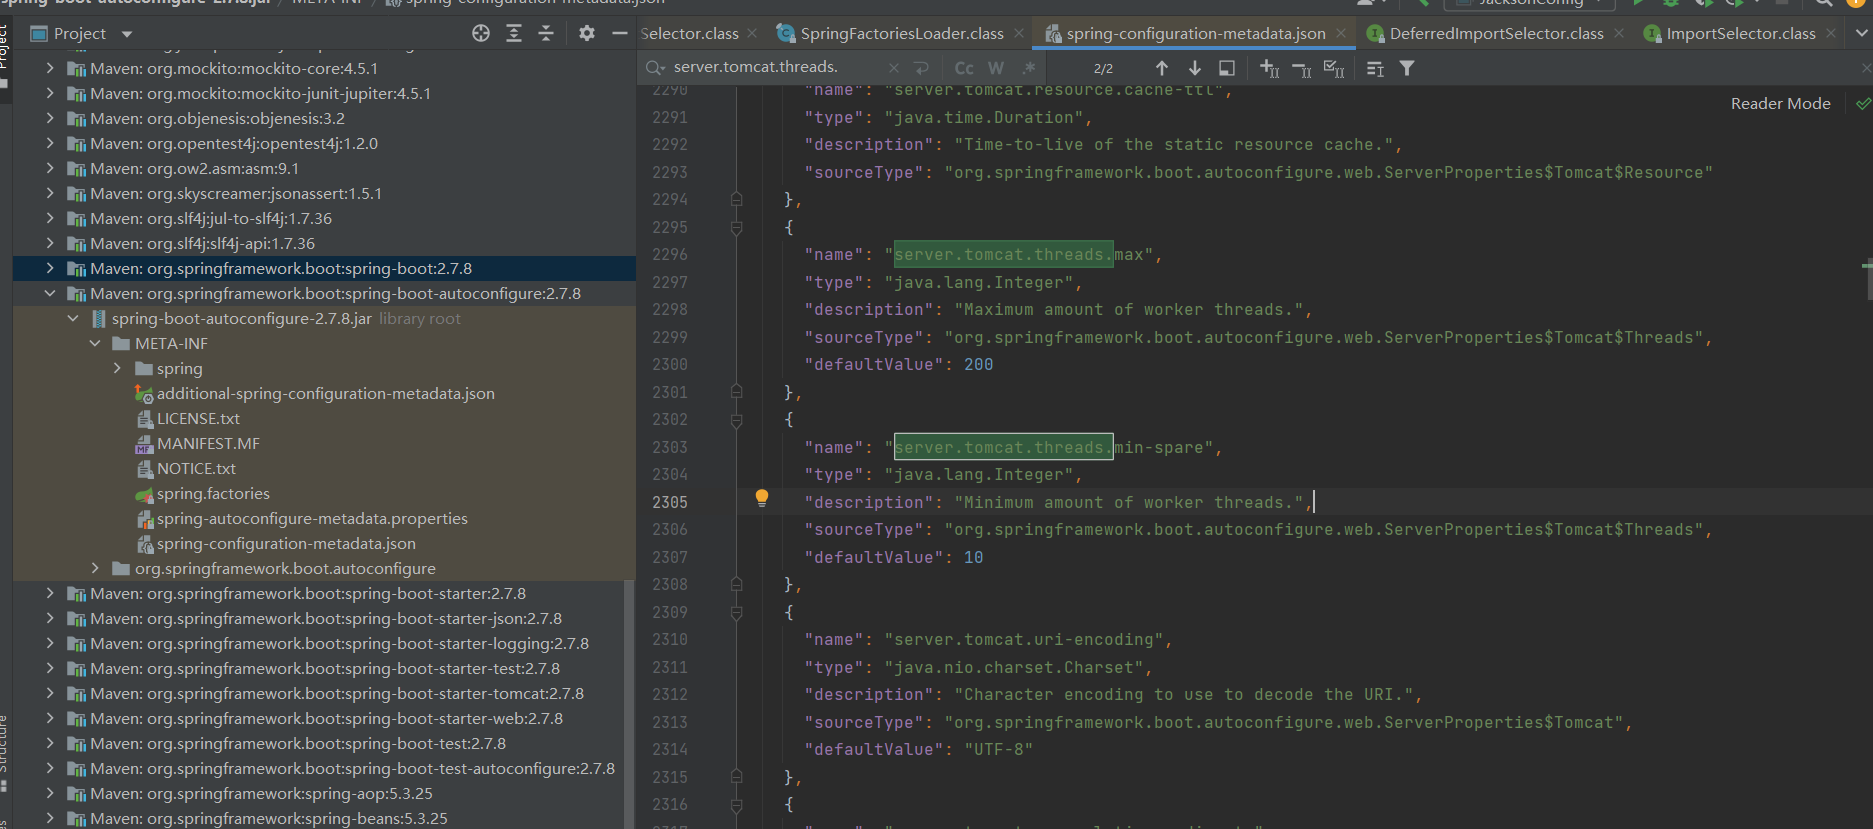
默认值可以在这里看

image-20240101195734890

Q&A

  • 并发量指的是连接数还是线程数
    连接数

  • 最大的200个线程如何处理10000条连接
    Tomcat的两种处理连接的模式,一种是BIO,一个线程只处理一个Socket连接,另一种是NIO,一个线程处理多个Socket连接,由于HTTP请求不会太耗时且多个连接一般不会同时来消息,所以一个线程处理多个连接没有太大问题

  • 多开线程与增加连接数
    增加线程一个影响就是会增加线程切换时的上下文的切换时间,且线程增多,在核数不变的请宽心,每个线程分配到的时间片会变小,所以多开线程并不一定会提高处理效率
    如果增加连接数,支持的并发量会提高,但是如果硬件条件没有提升,则并发量的提升只能是以牺牲响应时间为代价

SpringBoot启动速度优化

  • 设置Bean为懒加载
    启动是快了,但是初次执行慢了

    1
    2
    3
    spring:
    main:
    lazy-initialization: true
  • spring5支持的创建扫描索引
    引入需要的依赖,启动类上添加@Indexed注解,在打包时会创建扫描索引spring.components到META-INF文件夹中,索引中保存Bean的全类名,执行时直接从索引中读取,不再需要挨个查看类注解

  • 使用JDK17,其中提供了更优秀的垃圾回收器

  • 使用SpringBoot3,其中提供了一个本地化的解决,执行更快

SpringBoot解决跨域

  • jsonp+callback
    只支持get请求,前后端需要共同编码

  • CORS(接口粒度)
    CrossOrigin(源)注解标注在Mapping方法上

  • WebMvcConfigurer(批量)
    重写该接口的addCorsMappings方法,添加跨域配置

  • CorsFilter(全局)
    在容器中添加一个CorsFilter的Bean,需要浏览器支持

  • NGINX(推荐)
    在前端使用NGINX部署的情况下,将访问后端的请求改为访问前端服务器,但通过路径(比如添加一个前缀)区分,接着在NGINX中添加配置进行代理转发。因为NGINX是不会有跨域限制的,且浏览器发现你访问的还是前端服务器,也不会告警

配置读取

  • Value
    在当前类是一个Bean的前提下,可以通过在成员变量(非static或者final)上面添加@Value注解,参数为${yaml中的坐标},若配置文件中没有这个坐标,则启动时会报错。
    可以给个默认值提高容错性:

    1
    @Value("${a.name:}")

    冒号后可添加默认值或者不加(赋空值“”)

  • ConfigurationProperties
    指定一个前缀,会将前缀下的所有配置注入到当前Bean的成员变量中

  • Environment
    容器中会有一个Spring暴露出来的Bean叫做Enviroment,可通过自动注入将其注入到当前环境,通过该Bean的getProperty(配置坐标)方法获取配置
    或者可以通过实现EnvironmentAware接口去获取容器中的env对象

  • PropertySource注解
    可以指定其他的properties配置文件来进行读取,可通过一些配置读取自定义的yaml文件

  • 通过输入流的方式手动读取
    使用getResourceAsStream获取jar包中输入流

SpringBoot默认AOP

spring默认行为是代理类有接口使用jdk代理,没有实现接口使用cglib,但springboot是强制所有都使用cglib来作为aop的实现,cglib进行代理时会动态生成字节码,这样可以获得接口实现类的信息比如方法注解,否则只能获取接口上的信息。其次使用CGlib可以使用接口或者实现类类型的变量来接受,但如果使用java原生AOP,则只能使用接口来接受,若该实现类没有接口,则会生成一个该类的子类对象为Bean

SpringBoot核心注解

  • SpringBootApplication
  • SpringBootConfiguration
  • EnableAutoConfiguration
  • ConditionalOn…
    自动配置相关的注解,自动配置就是boot的特性,所以conditional也是

内置Tomcat

  • 引入web依赖后,会引入服务器的自动配置,其中默认支持tomcat(通过conditionalOnClass:Tomcat.class),激活Tomcat的Factory配置
  • SpringBoot启动时创建一个容器,同时加载Bean
  • 此时会获取Tomcat的工厂Bean
  • 通过工厂的getwebserver获取tomcat,启动并挂起

外部Tomcat

  1. 将项目打包方式设为war
  2. 从web依赖中将tomcat依赖排除
  3. 实现接口SpringBootServletInitializer并重写configure方法,在其中返回 builder.sources(启动类)

SPI

java中通过配置文件的方式,将一些实现类注册到配置文件中,在运行时使用ServiceLoader.load方法,获取配置文件中的对应类的对象?

读取配置文件原理

通过事件监听器的方式读取

默认日志实现框架

默认门面slf4j,默认实现logback

若要切换为log4j:排除logback,添加slf4j-log4j12调节器

若要切换为log4j2:排除掉logback,添加log4j2的starter

读取request请求体不完整

原本使用inputstream的available来获取报文大小,但使用inputStream.available()并不总是返回整个流的大小。它只返回可以无阻塞地从此输入流读取(或跳过)的字节数的估计值。在实际应用中,这可能导致只读取了部分数据。
获取不到完整的请求体内容是因为HTTP请求的正文(body)长度是动态的,而inputStream.available()方法返回的是在不阻塞的情况下可以从输入流中读取的字节数。当输入流中的数据量少于或等于输入流内部的缓冲区大小时,available()方法可能返回的是小于实际数据量的值,这就会导致最后只读取了部分数据。为了完整地读取HTTP请求的正文内容,需要使用一个循环来不断读取输入流直到没有更多数据可读。

1
2
3
4
5
6
7
8
9
10
byte[] buffer = new byte[1024];
StringBuilder resBuilder= new StringBuilder();
int flag = -1;
try {
while ((flag = inputStream.read(buffer))!=-1){
resBuilder.append(new String(buffer,0,flag));
}
} catch (IOException e) {
throw new RuntimeException(e);
}

注意这里的buffer大小会决定在转字符串时是否完整

启动后初始化

使用PostConstruct注解

在一个被spring代理的组件中使用该注解标记一个方法,方法名不固定,该方法会在当前bean中所有属性注入后调用

1
2
3
4
5
6
7
8
9
@Component
public class SystemInit {
@Autowired
DirService dirService;
@PostConstruct
public void initd(){
System.out.println("123");
}
}

抽出公共模块,并引入公共模块中的配置

公共模块中配置文件命名可以参考:application-功能-环境.yaml,注意不要与其他模块中的配置文件同名

用到该公共模块的服务中,配置如下:

1
2
3
4
spring:
config:
import:
- application-功能-${spring.profiles.active}.yaml

tomcat对文件上传大小的限制

1
2
3
4
5
6
# 上传文件大小限制
spring:
servlet:
multipart:
max-file-size: 4GB
max-request-size: 4GB

接口参数校验

在实体类字段上进行校验规则的注解,在用到这些实体类的Controller上标记@Validated可以对所有Controller方法中,有进行字段校验的实体类进行校验,或者也可以直接标记在Controller方法,进行单个参数的校验。

1
2
3
4
5
6
7
8
9
10
11
12
13
14
15
16
17
18
19
20
21
22
23
24
25
26
27
28
public class FeedbackInfo extends BaseEntity {
/**
* ID
*/
@TableId(value = "ID", type = IdType.ASSIGN_ID)
private Long id;
/**
* 内容
*/
@NotEmpty
@TableField(value = "CONTENT")
@Schema(description = "反馈内容")
private String content;
/**
* 图片
*/
@TableField(value = "IMAGE")
@Schema(description = "反馈图片")
private byte[] image;
/**
* 用户 id
*/
@NotEmpty
@TableField(value = "USER_ID")
@Schema(description = "反馈用户ID")
private String userId;

}
1
2
3
4
@Validated
@RestController
@RequestMapping("/feedback")
public class FeedbackController {}

@RequestParam

如果Params和Body的form中都有一个相同名字的key,则在通过@RequestParam获取该key的时候会将两个值同时获取并拼接

文件上传与下载

文件上传

1
2
3
4
5
6
7
8
9
10
11
12
13
14
15
16
17
18
19
20
21
22
23
24
25
26
27
28
29
30
31
32
33
34
35
36
37
38
39
40
41
42
43
44
45
46
47
48
49
50
51
52
53
54
55
56
57
58
59
60
61
62
63
64
65
66
67
68
69
70
71
72
73
74
75
76
77
78
79
80
81
82
83
84
85
86
87
88
89
90
91
92
93
94
95
96
97
98
99
100
101
102
103
104
105
106
107
108
109
110
111
112
113
114
115
// contronller
@PostMapping("/upload")
@CdsApiOperation("上传操作手册")
@Operation(summary = "上传操作手册")
@CdsOperationLog(title = TitleConstant.AUTHOR, businessType = BusinessTypeConstant.ADD)
public Result upload(@RequestParam("file") MultipartFile mdZipFile, @RequestParam("title") String title) {
boolean save = manualService.createNewManual(mdZipFile, title);
if (save) {
return ResultUtil.ok(ResultEnum.SUCCESS);
}
return ResultUtil.fail("操作手册上传失败,请重试或联系管理员", ResultEnum.FAIL);
}
// service
@Override
@Transactional
public Boolean createNewManual(MultipartFile mdZipFile, String title) {
// 文件类型是否合法
String originalFilename = mdZipFile.getOriginalFilename();
String[] split = originalFilename.split("\\.");
if (!suffixSet.contains(split[split.length - 1])) {
throw new GlobalException("文件类型非支持的压缩格式,支持类型:" + suffixSet.stream().collect(Collectors.joining(",")));
}
// 判断是否已存在
LambdaQueryWrapper<ManualInfo> wrapper = new LambdaQueryWrapper<>();
wrapper.eq(ManualInfo::getTitle, title);
Long l = baseMapper.selectCount(wrapper);
if (l != 0) {
// 存在则返回false
return false;
}
// 插入到数据库,获取id
baseMapper.insert(ManualInfo.builder().title(title).build());
ManualInfo manualInfo = baseMapper.selectOne(wrapper);
Long id = manualInfo.getId();
// 保存压缩包到 /manual/id/zip/..
String currentManualPath = MD_PATH + "/" + id;
String zipFilePath = currentManualPath + ZIP_DIR;
String zipFileName = MD_PATH + "/" + id + ZIP_DIR + "/" + originalFilename;
try {
File zipFilePathFile = new File(zipFilePath);
if (!zipFilePathFile.exists()) {
zipFilePathFile.mkdirs();
}
FileCopyUtils.copy(mdZipFile.getInputStream(), new FileOutputStream(zipFileName));
} catch (IOException e) {
throw new GlobalException(e.getMessage());
}
// 解压压缩包到 /manual/id/content/..
String contentFilePath = currentManualPath + CONTENT_DIR + "/";
try {
ZipUtil.unzip(zipFileName, contentFilePath, ZipUtil.UTF_8);
} catch (FileNotFoundException e) {
throw new GlobalException(e.getMessage());
}
// 进入内容文件夹,将存储图片的文件夹重命名为image
File currentContentDir = new File(contentFilePath);
File[] files = currentContentDir.listFiles();
for (File c : files) {
// 可能存在没有图片文件夹的情况
if (c.isDirectory()) {
c.renameTo(new File(currentContentDir + IMG_DIR + "/"));
} else if (c.getName().endsWith("md")) {
// 处理md文件内容,修改图片地址
// 开启缓冲reader,按行读取,读到图片地址则替换
BufferedReader bufferedReader = null;
BufferedWriter bufferedWriter = null;
try {
bufferedReader = new BufferedReader(new FileReader(c));
File target = new File(c.getParentFile(), id + ".md");
bufferedWriter = new BufferedWriter(new FileWriter(target));
String currentLine = null;
while ((currentLine = bufferedReader.readLine()) != null) {
Pattern pattern = Pattern.compile("!\\[.*\\]\\((.*)\\)");
Matcher matcher = pattern.matcher(currentLine);
if (matcher.find()) {
// TestManual/image-20240422144302572.png
String oriImg = matcher.group(1);
// 获取图片名
String[] split1 = oriImg.split("[/,\\\\]");
String imgFileName = split1[split1.length - 1];
// 组装服务器地址
StringBuilder sb = new StringBuilder(SERVER_IMG_PATH_PERFIX);
sb.append("?");
sb.append("id=").append(id);
sb.append("&");
sb.append("img=").append(imgFileName);
String serverImgPath = sb.toString();
currentLine = currentLine.replace(oriImg, serverImgPath);
}
// 写入拷贝
bufferedWriter.write(currentLine);
bufferedWriter.newLine();
}
} catch (IOException e) {
throw new GlobalException(e.getMessage());
} finally {
if (bufferedReader != null) {
try {
bufferedReader.close();
} catch (IOException e) {
throw new GlobalException(e.getMessage());
}
}
if (bufferedWriter != null) {
try {
bufferedWriter.close();
} catch (IOException e) {
throw new GlobalException(e.getMessage());
}
}
}
}
}
return true;
}

下载文件

1
2
3
4
5
6
7
8
9
10
11
12
13
14
15
16
17
18
19
// controller
@GetMapping("/getOriginZip")
@CdsApiOperation("获取原件")
@Operation(summary = "获取原件")
public void getOriginZip(HttpServletResponse response, @RequestParam("id") Long id) {
LambdaQueryWrapper<ManualInfo> wrapper = new LambdaQueryWrapper<>();
wrapper.eq(ManualInfo::getId, id);
ManualInfo one = manualService.getOne(wrapper);
if (one == null) {
response.setStatus(HttpServletResponse.SC_NOT_FOUND);
return;
}
try {
ServletOutputStream outputStream = response.getOutputStream();
manualService.getOriginZip(id, outputStream);
} catch (IOException e) {
throw new GlobalException(e.getMessage());
}
}

Springboot升级3.2报错

问题一

Spring Boot 升级 3.2 报错 Invalid value type for attribute ‘factoryBeanObjectType‘: java.lang.String_invalid value type for attribute ‘factorybeanobjec-CSDN博客

Invalid value type for attribute ‘factoryBeanObjectType’: java.lang.String

原因,mybatis的实现中用到的api在springboot3.2后更改了

解决方法:使用mybtais plus 355

注意组件id与springboot2.几的时候不同,但不改居然也能下载东西

1
2
3
4
5
<dependency>
<groupId>com.baomidou</groupId>
<artifactId>mybatis-plus-spring-boot3-starter</artifactId>
<version>3.5.7</version>
</dependency>

问题二

从 Spring Boot 3.1.5 升级到 3.2.0 后出现错误“IllegalStateException: No target Validator set” - java - SO中文参考 - www.soinside.com

java.lang.IllegalStateException: No target Validator set

1
2
3
4
<dependency>
<groupId>org.springframework.boot</groupId>
<artifactId>spring-boot-starter-validation</artifactId>
</dependency>

NotBlank不再支持数值类型,需要改为NotNull

image-20240816112842668

LocalDateTime

LocalDateTime 反序列化问题

在实体类中使用LocalDateTime 类型接收字符串时,需要在字段上添加@JsonFormat(pattern = "yyyy-MM-dd HH:mm:ss")注解,且pattern不可变,同时前端传值必须传时分秒

或者可自定义反序列化器.

1
2
3
4
5
6
7
8
9
10
11
12
13
14
15
16
17
18
19
20
21
/**
* 加工部门退样至下一环节
*/
@Schema(description = "加工部门退样至下一环节")
@JsonDeserialize(using = NoTimeLocalDateTimeDeserializer.class)
private LocalDateTime pdReturnsCleanCopyToNextStage;


// =========

public class NoTimeLocalDateTimeDeserializer extends JsonDeserializer<LocalDateTime> {
@Override
public LocalDateTime deserialize(JsonParser jsonParser, DeserializationContext deserializationContext) throws IOException, JacksonException {
String dateStr = jsonParser.getText().trim();
DateTimeFormatter formatter = DateTimeFormatter.ofPattern("yyyy-MM-dd").withZone(ZoneId.of("GMT+8"));
LocalDate date = LocalDate.parse(dateStr, formatter);
return date.atStartOfDay(); // 默认为午夜时间
}
}