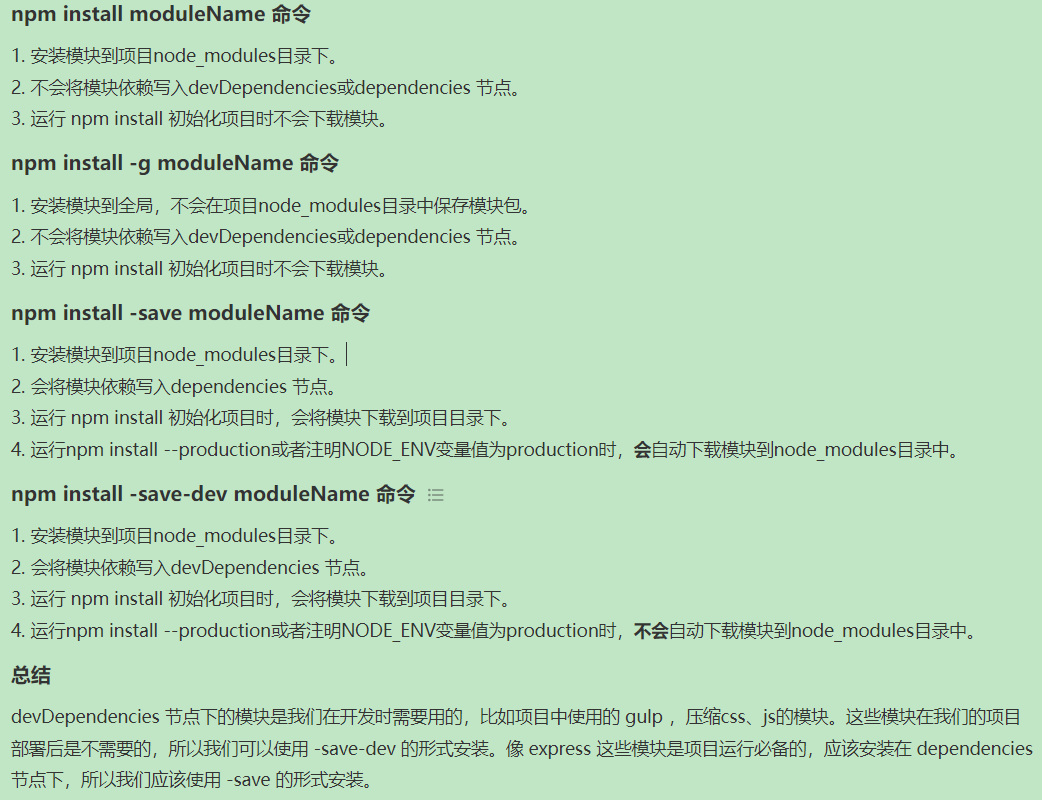
npm install 1 2 3 4 5 6 7 8 npm install moduleName npm install -g moduleName npm install -save moduleName npm install -save-dev moduleName
npm 文件夹权限 右键属性,安全页面给所有用户完全访问权限
【Node.js】Node.js安装及环境配置 - 腾讯云开发者社区-腾讯云 (tencent.com)
安装electron npm install electron --save-dev
简单构建 初始化脚手架 这里注意入口需要设为main.js而不是默认的index
参数类似于
1 2 3 4 5 6 7 8 9 10 11 12 13 14 15 { "name" : "my-electron-app" , "version" : "1.0.0" , "description" : "Hello World" , "main" : "main.js" , "scripts" : { "test" : "echo \"Error: no test specified\" && exit 1" } , "author" : "Boranget" , "license" : "MIT" , "devDependencies" : { "electron" : "^21.2.2" } }
修改package.json,在scripts字段下新增:
1 2 3 4 5 { "scripts" : { "start" : "electron ." } }
运行主进程 在根目录下创建main.js,并运行npm start
最后文件结构 index.html
1 2 3 4 5 6 7 8 9 10 11 12 13 14 15 16 <!DOCTYPE html > <html > <head > <meta charset ="UTF-8" > <meta http-equiv ="Content-Security-Policy" content ="default-src 'self'; script-src 'self'" > <title > Hello World!</title > </head > <body > <h1 > Hello World!</h1 > We are using Node.js <span id ="node-version" > </span > , Chromium <span id ="chrome-version" > </span > , and Electron <span id ="electron-version" > </span > . <script src ="./render.js" > </script > </body > </html >
main.js
1 2 3 4 5 6 7 8 9 10 11 12 13 14 15 16 17 18 19 20 21 22 23 24 25 26 27 28 29 30 31 32 33 34 35 36 37 38 39 40 41 const {app, BrowserWindow } = require ('electron' )const path = require ('path' )const createWinddow = ( const win = new BrowserWindow ({ width : 800 , height :600 , webPreferences :{ preload : path.join (__dirname, 'preload.js' ) } }) win.loadFile ('index.html' ) } app.whenReady ().then ( ()=> { createWinddow () app.on ('activate' ,()=> { if (BrowserWindow .getAllWindows ().length === 0 ){ createWinddow () } }) } ) app.on ('window-all-closed' , ()=> { if (process.platform !== 'darwin' ){ app.quit () } })
preload.js
1 2 3 4 5 6 7 8 9 10 11 window .addEventListener ('DOMContentLoaded' , ()=> { const replaceText = (selector,text )=>{ const element = document .getElementById (selector) if (element){ element.innerText = text } } for (const dependency of ['chrome' , 'node' , 'electron' ]){ replaceText (`${dependency} -version` ,process.versions [dependency]) } })
注意这里为何要用预加载:
在网页中我们需要获取node 版本号,这些信息在Node的全局变量process中,只能在主进程访问,但我们在主进程中无法直接编辑DOM,所以我们需要通过预加载脚本来控制DOM,预加载脚本在渲染器进程加载之前加载,并有权访问两个渲染器全局 (例如 window 和 document) 和 Node.js 环境。
一些node.js中的概念
总结
我们启动了一个Node.js程序,并将Electron添加为依赖。
我们创建了一个 main.js 脚本来运行我们的主要进程,它控制我们的应用程序 并且在 Node.js 环境中运行。 在此脚本中, 我们使用 Electron 的 app 和 BrowserWindow 模块来创建一个浏览器窗口,在一个单独的进程(渲染器)中显示网页内容。
为了访问渲染器中的Node.js的某些功能,我们在 BrowserWindow 的构造函数上附加了一个预加载脚本。
打包 使用 electron forge来进行打包
注意打包的时候必须保证package.json中的作者和描述字段不是空的
安装
1 2 npm install --save-dev @electron-forge/cli npx electron-forge import
转换脚本完成后,Forge 会将一些脚本添加到 package.json 文件中。
打包
日志打印 主进程打在vscode控制台,渲染进程打在浏览器的console
whenReady 通常使用触发器的 .on 函数来监听 Node.js 事件。
1 2 3 4 + app.on('ready', () => { - app.whenReady().then(() => { createWindow() })
但是 Electron 暴露了 app.whenReady() 方法,作为其 ready 事件的专用监听器,这样可以避免直接监听 .on 事件带来的一些问题。 参见 electron/electron#21972 。
预加载脚本=Preload 预加载脚本在渲染器加载网页之前加载。其挂载到渲染器进程上的(一个Window的实例),同时可以调用Node的api
在 BrowserWindow 构造器中使用 webPreferences.preload 传入脚本的路径。
1 2 3 4 5 const win = new BrowserWindow ({ webPreferences : { preload : 'path/to/preload.js' } })
在预加载脚本中使用内容桥可以设置在渲染进程中的全局变量
1 2 3 4 5 6 7 const { contextBridge } = require ('electron/renderer' )contextBridge.exposeInMainWorld ('versions' , { node : () => process.versions .node , chrome : () => process.versions .chrome , electron : () => process.versions .electron })
renderer.js
1 2 const information = document .getElementById ('info' )information.innerText = `This app is using Chrome (v${window .versions.chrome()} ), Node.js (v${window .versions.node()} ), and Electron (v${window .versions.electron()} )`
index.html中
1 <script src="./renderer.js" ></script>
Electron 应用通常使用预加载脚本来设置进程间通信 (IPC) 接口以在两种进程之间传输任意信息。由于其是在网页加载之前执行的,故可以在加载网页之前设置全局变量,将预留的主进程订阅服务引入渲染器进程。
进程间通信 主进程暴露、渲染进程调用 让渲染进程和主进程互相通信
可使用 Electron 的 ipcMain 模块和 ipcRenderer 模块来进行进程间通信。 从网页向主进程发送消息,可以使用 ipcMain.handle 设置一个主进程处理程序(handler),然后在预处理脚本 中暴露一个 ipcRenderer.invoke 的函数来触发该处理程序(handler)。
1 2 3 4 5 6 7 8 9 const { contextBridge, ipcRenderer } = require ('electron' )contextBridge.exposeInMainWorld ('versions' , { node : () => process.versions .node , chrome : () => process.versions .chrome , electron : () => process.versions .electron , ping : () => ipcRenderer.invoke ('ping' ) })
不建议直接通过 context bridge 暴露 ipcRenderer 模块,这将使得渲染器能够直接向主进程发送任意的 IPC 信息,会使得其成为恶意代码最强有力的攻击媒介。
如上的代码相当于提前构造好了一个函数ping并发布到了渲染进程的全局变量中,该函数的行为为从ipcRenderer中触发了ping这个事件,接下来需要在主进程中接受这个事件。
1 2 3 4 5 6 7 8 9 10 11 12 13 14 15 16 17 18 const { app, BrowserWindow , ipcMain } = require ('electron/main' )const path = require ('node:path' )const createWindow = ( const win = new BrowserWindow ({ width : 800 , height : 600 , webPreferences : { preload : path.join (__dirname, 'preload.js' ) } }) win.loadFile ('index.html' ) } app.whenReady ().then (() => { ipcMain.handle ('ping' , () => 'pong' ) createWindow () })
渲染进程(页面js)调用
1 2 3 4 5 6 7 const information = document .getElementById ('info' )information.innerText = `This app is using Chrome (v${window .versions.chrome()} ), Node.js (v${window .versions.node()} ), and Electron (v${window .versions.electron()} )` const func = async ( const response = await window .versions .ping () console .log (response) } func ()
渲染进程暴露,主进程调用 主进程中使用webContents发送消息
1 click : () => mainWindow.webContents .send ('update-counter' , 1 ),
preload中
1 2 3 4 5 6 const { contextBridge, ipcRenderer } = require ('electron/renderer' )contextBridge.exposeInMainWorld ('electronAPI' , { onUpdateCounter : (callback ) => ipcRenderer.on ('update-counter' , (_event, value ) => callback (value)), counterValue : (value ) => ipcRenderer.send ('counter-value' , value) })
渲染进程
1 2 3 4 5 6 window .electronAPI .onUpdateCounter ((value ) => { const oldValue = Number (counter.innerText ) const newValue = oldValue + value counter.innerText = newValue.toString () window .electronAPI .counterValue (newValue) })
在BrowserWindow对象实例win上执行win.webContents.openDevTools()即可打开开发者工具
BrowserWindow 每个BW的实例会创建一个应用程序窗口,且再单独的渲染器进程中加载一个网页。可通过属性webContents获取内容。当一个BW实例被销毁时,其渲染器进程也会终止。
上下文隔离 预加载脚本 和 Electron的内部逻辑 运行在所加载的 webconten网页 之外的另一个独立的上下文环境。如果您在预加载脚本中设置 window.hello = 'wave' 并且启用了上下文隔离,当网站尝试访问window.hello对象时将返回 undefined。
在上下文启用的情况下,可以在预加载脚本中使用contextBridgeapi进行内容的暴露
菜单 1 2 3 4 5 6 7 8 9 10 11 12 13 14 15 16 17 const menu = Menu .buildFromTemplate ([ { label : app.name , submenu : [ { click : () => mainWindow.webContents .send ("update-counter" , 1 ), label : "Increment" , }, { click : () => mainWindow.webContents .send ("update-counter" , -1 ), label : "Decrement" , }, ], }, ]); Menu .setApplicationMenu (menu);

