虚拟DOM
- 本质是object类型的一般对象
- 虚拟DOM属性较少(相对于真实DOM),因为虚拟DOM是React的内部使用,无需真实DOM的那么多属性
- 虚拟DOM最终会被React转换为真实DOM呈现在页面上
1
2
3
4
5
6
7
8
9
10
11
12
13
14
15
16
17
18
19
20
| <!DOCTYPE html>
<html>
<head>
<script src="https://cdnjs.cloudflare.com/ajax/libs/react/15.4.2/react.js"></script>
<script src="https://cdnjs.cloudflare.com/ajax/libs/react/15.4.2/react-dom.js"></script>
<script src="https://cdnjs.cloudflare.com/ajax/libs/babel-standalone/6.26.0/babel.js"></script>
<script type="text/babel">
const VDOM = (
<div>
<h1>Hello World</h1>
<p>This is a paragraph</p>
</div>
);
ReactDOM.render(VDOM, document.getElementById("root"));
</script>
</head>
<body>
<div id="root"></div>
</body>
</html>
|
jsx语法
函数式组件
- 首字母必须大写
- 引用需要加尖括号作为一个标签
- 严格模式禁止自定义函数中的this指向window,babel默认翻译为严格模式
1
2
3
4
5
6
7
8
9
| const MyComponent = () => {
return (
<div>
<h1>Hello World</h1>
</div>
);
};
ReactDOM.render(<MyComponent />, document.getElementById("root"));
|
React解析组件标签,找到组件,发现组件是函数式组件,调用该函数,获取虚拟DOM,将其转换为真实DOM,呈现在页面中。
函数式组件适合构建没有状态的简单组件
类组件
ES6中的类
- 类中的构造器不是必须要写的,除非要对实例进行一些初始化
- 若A类继承B类,且A类中写了构造器,则A类构造器中必须调用super的构造器
- 类中所定义的方法,都是放在了类的原型对象上,供实例去使用。
this
- 不开启严格模式,函数中的this指向为window
- 开启严格模式,函数中的this指向为undefined
- 通过组件实例去调用组件实例内部的函数,组件实例函数中的this指向组件实例
- 类中方法this的指向
- 类中所有方法在局部都开起了严格模式
- 类中方法作为回调函数时,不是通过实例调用,而是直接调用,这时this为undefined
- 在构造器和render中的this为当前实例,可在构造器中使用bind方法,获取一个绑定了当前实例对象的方法,然后将方法赋予当前实例对象中的同名函数
- 箭头函数与直接function的区别
- a = ()=>{} 与 a = function(){}
- 箭头函数没有自己的this,当在其中调用this时,会寻找其外部函数的this
类组件
1
2
3
4
5
6
7
8
9
10
| class HelloMessage extends React.Component {
render() {
return <h1>Hello {this.props.name}</h1>;
}
}
ReactDOM.render(
<HelloMessage name="John" />,
document.getElementById('root')
);
|
需要继承父类React.Component
需要用render返回渲染的组件
render放在类对象的原型对象上,供实例使用
render中的this是组件类对象的实例对象
React解析组件标签,找到了组件,发现组件是类组件,new出了该类的实例,调用该实例的render函数,获取虚拟DOM,将其转换为真实DOM,呈现在页面中
类组件适合构建有状态的复杂组件
state
用于保存组件状态,渲染时使用,注意的是,state属性中的值不可以通过state属性名直接更改,直接更改会导致react无法监控到对象的变化,应该通过调用set方法去进行更改,set方法应该是通过object操作更新的,所以不会影响state中的其他属性
1
2
3
4
5
6
7
8
9
10
11
12
| class Weather extends React.Component {
constructor(props) {
super(props);
this.state = {
isHot: false,
};
}
render() {
return <div>今天天气{this.state.isHot ? "很热" : "很冷"}<button onClick={() => this.setState({ isHot: !this.state.isHot })}>切换</button></div>;
}
}
ReactDOM.render(<Weather />, document.getElementById("root"));
|
注意这里在绑定事件时,使用的并不是原生的属性,onclick变为了onClick
1
2
3
4
5
6
7
8
9
10
11
12
13
14
15
| class Weather extends React.Component {
constructor(props) {
super(props);
this.state = {
isHot: false,
};
}
change(){
this.setState({ isHot: !this.state.isHot })
}
render() {
return <div>今天天气{this.state.isHot ? "很热" : "很冷"}<button onClick={this.change.bind(this)}>切换</button></div>;
}
}
ReactDOM.render(<Weather />, document.getElementById("root"));
|
主要看这里的onClick回调函数需要通过bind绑定一下this,这是因为如果不绑定,直接将this.change交给onClick的话(这里只是将this,change这个对象赋值给了onClick这个属性,调用的时候并不是这里的this调用),在调用这个方法的时候是直接调用,然而类中的方法默认开启了局部严格模式,this在严格模式下会指向undefind,故会出错
或者在构造器中将change方法改绑为bind操作包装后的change方法(事实上,bind的效果为,将调用者实例方法复制一份,挂在bind的参数中,最后bind会返回一个新函数。这里就是将本来在原型链上的change方法复制了一份,直接挂在了Weather的实例上【实例方法默认是挂在实例的原型链上而不是直接挂在实例上】)
1
2
3
4
5
6
7
8
9
10
11
12
13
14
15
| class Weather extends React.Component {
constructor(props) {
super(props);
this.state = {
isHot: false,
};
this.change = this.change.bind(this);
}
change(){
this.setState({ isHot: !this.state.isHot })
}
render() {
return <div>今天天气{this.state.isHot ? "很热" : "很冷"}<button onClick={this.change}>切换</button></div>;
}
}
|
render为每次修改状态,每次渲染都需要调用的
state相关简写
- 初始化状态可以直接在类中定义
- 状态更改方法及其this绑定可借助箭头函数特性
1
2
3
4
5
6
7
8
9
10
11
12
13
14
15
16
17
18
| class Weather extends React.Component {
state = {
isHot: false,
};
change = ()=> {
this.setState({ isHot: !this.state.isHot });
}
render() {
return (
<div>
今天天气{this.state.isHot ? "很热" : "很冷"}
<button onClick={this.change}>切换</button>
</div>
);
}
}
ReactDOM.render(<Weather />, document.getElementById("root"));
|
props
react会将组件标签中的属性作为参数传到组件中,并将其赋给组件中props属性上做为一个对象,另外,组件标签中若有内容,则会以“children”作为key放入props中,注意props是只读的
1
2
3
4
5
6
7
8
9
10
11
12
13
14
15
16
| class Hello extends React.Component {
render() {
return (
<div>
<h1>Hello, {this.props.name}</h1>
<p>{this.props.children}</p>
</div>
);
}
}
ReactDOM.render(
<Hello name="World">
This is a child element.
</Hello>,
document.getElementById('root')
);
|
在jsx和react中可以使用展开运算符进行标签props传参
1
2
3
4
5
6
7
8
9
10
11
12
13
14
15
16
17
18
19
20
21
22
23
24
|
class Weather extends React.Component{
state={temp:0}
changeTemp=()=>{
this.setState({temp:this.state.temp+1})
}
render(){
return(
<div>
<button onClick={this.changeTemp}>+</button>
{this.state.temp}
{this.props.weather}
{this.props.temp}
{this.props.wind}
</div>
)
}
}
const tempValue = {
weather: "晴天",
temp: "20度",
wind: "微风"
}
ReactDOM.render(<Weather {...tempValue} />,document.getElementById('root'))
|
另外在标签属性传参时,如果是要接受非字符串类型
1
2
3
4
5
6
7
8
9
10
11
12
13
|
class Weather extends React.Component {
render() {
return <div>{this.props.value + 1}</div>;
}
}
ReactDOM.render(
<Weather value={1} />,
document.getElementById("root")
);
|
可对props进行接受的参数中:必传的限制,类型的限制以及默认值的设置,需要引入新依赖propTypes,使用方法:在类(不是设实例对象)上添加一个静态属性,该属性必须名为propTypes,使用键值对的方式在该对象中定义规则,预定义规则从PropTypes中获取,使用defaultProps设置默认值。
1
2
3
4
5
6
7
8
9
10
11
12
13
14
15
16
17
18
19
20
21
22
23
24
25
26
27
28
29
| <script src="https://cdnjs.cloudflare.com/ajax/libs/prop-types/15.6.1/prop-types.js"></script>
<script type="text/babel">
class Person extends React.Component {
render() {
return (
<div>
<h1>Hello {this.props.name}!</h1>
<p>你好,{this.props.name}!</p>
<p>你今年{this.props.age}岁了,{this.props.sex}。</p>
<button onClick={this.props.speak}>说一句话</button>
</div>
);
}
}
Person.propTypes = {
name:PropTypes.string.isRequired,
sex:PropTypes.string.isRequired,
age:PropTypes.number.isRequired,
speak:PropTypes.func.isRequired,
};
Person.defaultProps = {
sex: '男',
};
ReactDOM.render(
<Person name="张三" age={25} speak={() => console.log('hello')} />,
document.getElementById("root")
);
</script>
|
当然可以通过static关键字直接放到类中
1
2
3
4
5
6
7
8
9
10
11
12
13
14
15
16
17
18
19
20
21
22
23
| class Person extends React.Component {
render() {
return (
<div>
<h1>Hello {this.props.name}!</h1>
<p>你好,{this.props.name}!</p>
<p>
你今年{this.props.age}岁了,{this.props.sex}。
</p>
<button onClick={this.props.speak}>说一句话</button>
</div>
);
}
static propTypes = {
name: PropTypes.string.isRequired,
sex: PropTypes.string.isRequired,
age: PropTypes.number.isRequired,
speak: PropTypes.func.isRequired,
};
static defaultProps = {
sex: "男",
};
}
|
函数值组件可通过参数接受来使用props,并且可以进行限制
1
2
3
4
5
6
7
8
9
10
11
12
13
14
15
16
17
18
19
20
21
| const Person = (props) => {
return (
<div>
<h1>Hello {props.name}!</h1>
<p>你好,{props.name}!</p>
<p>
你今年{props.age}岁了,{props.sex}。
</p>
<button onClick={props.speak}>说一句话</button>
</div>
);
};
Person.propTypes = {
name: PropTypes.string.isRequired,
sex: PropTypes.string.isRequired,
age: PropTypes.number.isRequired,
speak: PropTypes.func.isRequired,
};
Person.defaultProps = {
sex: "男",
};
|
refs
字符串ref(不推荐)
使用ref标识标签可获得标签的对象,类似于id但无需通过getElementById获取对象,在组件内可通过refs属性获取定义的ref属性
1
2
3
4
5
6
7
8
9
10
11
12
13
14
15
| class Person extends React.Component {
paste = () => {
alert(this.refs.firstname.value + " " + this.refs.lastname.value);
};
render() {
return (
<div>
<input ref="firstname" type="text" placeholder="First Name" />
<input ref="lastname" type="text" placeholder="Last Name" />
<button onClick={this.paste} >Paste</button>
</div>
);
}
}
ReactDOM.render(<Person />, document.getElementById("root"));
|
回调形式ref
将一个回调函数赋给ref属性,可以通过内联函数和外置函数两种方式定义。
1
2
3
4
5
6
7
8
9
10
11
12
13
14
15
16
17
18
| class Person extends React.Component {
paste = () => {
alert(this.firstname.value + " " + this.lastname.value);
};
getLastName = node => {
this.lastname = node;
};
render() {
return (
<div>
<input ref= {node => this.firstname = node} type="text" placeholder="First Name" />
<input ref= {this.getLastName} type="text" placeholder="Last Name" />
<button onClick={this.paste} >Paste</button>
</div>
);
}
}
ReactDOM.render(<Person />, document.getElementById("root"));
|
creatRef 形式(最推荐但是麻烦)
一个create出来的ref容器只能存一个节点
收集表单数据
可以将监听函数封装
1
2
3
4
5
6
7
8
9
10
11
12
13
14
15
16
17
18
19
20
21
22
23
| class UserForm extends React.Component {
state = {
username: "",
password: "",
};
listenFormChange = () => {
return (e)=>{
this.setState({[e.target.name]: e.target.value});
}
}
render() {
return (
<div>
<form onSubmit={e => {e.preventDefault(); console.log(this.state)}}>
username: <input onChange = {this.listenFormChange()} name="username" />
password: <input onChange = {this.listenFormChange()} name="password" />
<button type="submit">Submit</button>
</form>
</div>
);
}
}
ReactDOM.render(<UserForm />, document.getElementById("root"));
|
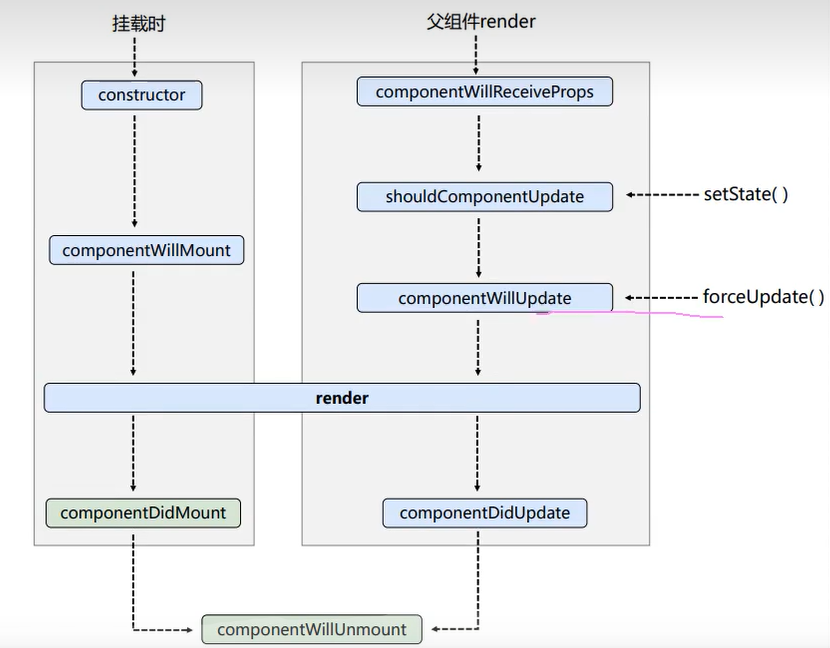
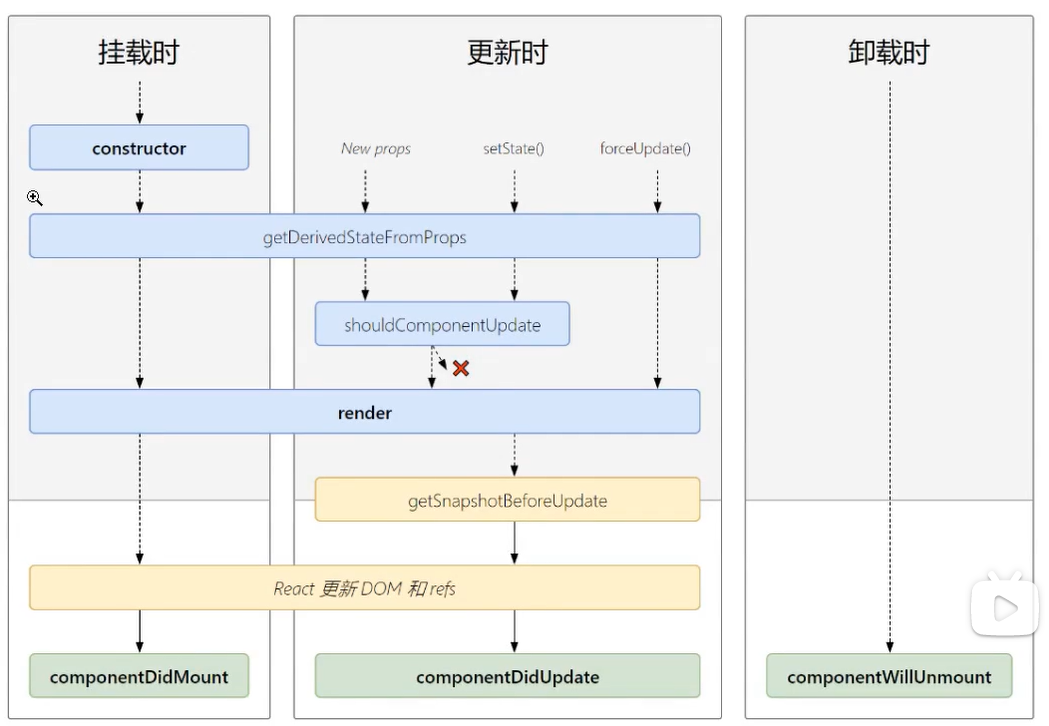
生命周期
生命周期函数都是由组件实例所调用,注意其中this指向
- componentDidMount 组件已挂载
- componentWillUnmount 组件将要卸载
旧生命周期

新生命周期

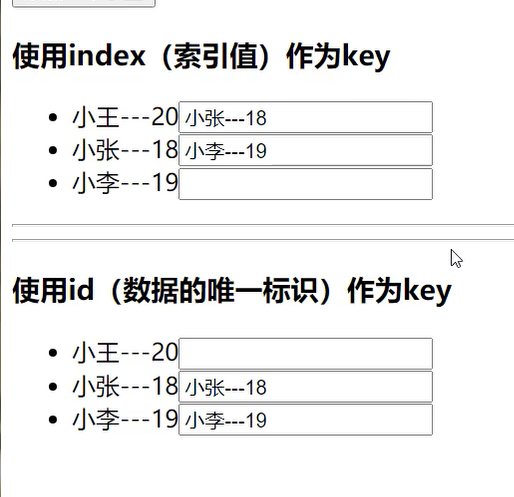
key
key不能使用index的原因(单纯的展示,不进行修改倒也可以):
- 渲染效率
- 数据错乱

react脚手架
使用 create-react-app 进行react项目的初始化
1
2
3
| npx create-react-app my-app
cd my-app
npm start
|
如果你之前通过 npm install -g create-react-app 全局安装了 create-react-app,我们建议你使用 npm uninstall -g create-react-app 或 yarn global remove create-react-app 卸载软件包,以确保 npx 始终使用最新版本。
数据存放
划分区域,哪几个区域会共享数据,就将共享的数据放到他们共同的父组件中
组件间的数据传递
父传子使用标签属性结合子组件中的props接收,祖孙关系则一层层传下去
子传父需要父组件传一个回调以标签属性的方式给子,子带上参数去调用这个回调
当父组件通过props将state中的数据传给子组件,当这个数据更新时,会使得子组件的props也变化,触发子组件的重新渲染
window的api
window的api需要通过window调用,比如window.confirm
一些属性
checkBox的属性:checked如果与某个值绑定,则必要添加onChange属性,或者使用defaultChecked,但defaultChecked属性只在页面第一次渲染有效
脚手架代理
单个代理
proxy可以转发浏览器发给前端服务器的请求到别的地方,策略默认是前端服务器上没有的资源则转发,前端服务器上有则直接返回前端服务器上的资源
package.json:
1
2
3
4
| {
"proxy":"http://localhost:5000"
}
|
多个代理
在脚手架项目的src目录下,新建文件setupProxy.js,
1
2
3
4
5
6
7
8
9
10
11
12
13
14
15
16
17
18
19
20
21
| const proxy = require("http-proxy-middleware");
module.exports = function (app) {
app.use(
proxy("/api1",{
target: "http://localhost:3000",
changeOrigin: true,
pathRewrite: {
"^/api1": "",
},
}),
proxy("/api2",{
target: "http://localhost:3001",
changeOrigin: true,
pathRewrite: {
"^/api2": "",
},
})
);
};
|
消息订阅与发布
PubSubJS
发布:
使用publish接口,第一个参数为要发布的消息,第二个参数为携带的数据
1
2
| import PubSub from "pubsub-js";
PubSub.publish("addTodo", text);
|
订阅:
使用subscribe接口,第一个参数是要订阅的消息名称,第二个参数是收到消息后的处理方法,该方法有两个参数,第一个参数为消息名,第二个参数为发布该消息时携带的数据
1
2
3
4
5
6
7
8
9
10
| import PubSub from "pubsub-js";
componentDidMount() {
PubSub.subscribe("addTodo", (MsgName, data) => {
const items = [
...this.state.items,
{ id: Date.now(), checked: false, data },
];
this.setState({ items });
});
};
|
路由
SPA
单页面应用,整个页面只有一个应用,点击链接不会刷新页面,只会做页面的局部更新,数据通过ajax请求获取
history
前端路由通过浏览器的history实现,浏览器的地址栏会显示历史栈最顶层的记录,可以通过调用history的监听器注册方法将监听器注册到history中,当history变化时会通知监听器。可对history进行push/replace等操作
相关组件
Router:
在react中,Router分为BowserRouter和HashRouter,用于包裹路由相关组件,包括Link和Route
相关的Link和Route在同一个Router下,Link才能控制Route
Route:
route用于包裹替换组件
Link:
用于设置跳转链接
NavLink:
可以自定义激活时类名的Link
1
| <NavLink activeClassName="i-am-active" className="menu-item" to="/a">About</NavLink>
|
demo
1
2
3
4
5
6
7
8
9
10
11
12
13
14
15
16
17
18
19
20
21
22
23
24
25
26
27
28
29
30
31
32
33
34
35
36
37
38
39
40
41
42
43
44
45
46
47
48
49
50
51
52
53
54
55
56
57
58
59
60
61
62
63
64
65
66
67
68
69
70
71
72
73
74
75
76
77
78
79
80
81
82
83
84
85
86
87
88
89
90
91
92
93
94
95
96
97
98
99
100
101
102
103
104
105
106
107
108
109
110
111
112
113
114
115
116
117
118
119
120
121
|
import React from'react';
import ReactDOM from'react-dom';
import App from './App';
import './index.css';
import { BrowserRouter } from 'react-router-dom';
ReactDOM.render(<BrowserRouter><App /></BrowserRouter>, document.getElementById('root'));
import React, { Component } from "react";
import Header from "./component/Header";
import Menu from "./component/Menu";
import A from "./component/A";
import B from "./component/B";
import { Route } from "react-router-dom";
export default class App extends Component {
render() {
return (
<div className="app">
<div className="top">
<Header />
</div>
<div className="center">
<Menu />
<Route className="content" path="/a" component={A} />
<Route className="content" path="/b" component={B} />
</div>
<div className="bottom">
<p>Footer</p>
</div>
</div>
);
}
}
import React, { Component } from 'react'
export default class Header extends Component {
render() {
return (
<div className="header" >
Header
</div>
)
}
}
import React, { Component } from 'react'
import { Link } from 'react-router-dom'
export default class Menu extends Component {
render() {
return (
<div className="menu" >
<Link className="menu-item" to="/a">A</Link>
<Link className="menu-item" to="/b">B</Link>
</div>
)
}
}
import React, { Component } from 'react'
export default class A extends Component {
render() {
return (
<div>
A
</div>
)
}
}
.app {
display: flex;
flex-direction: column;
height: 100vh;
}
.header {
background-color: #333;
color: #fff;
height: 50px;
display: flex;
align-items: center;
justify-content: space-between;
padding: 0 20px;
}
.center {
display: flex;
flex: 1;
}
.menu {
width: 200px;
background-color: #f2f2f2;
flex: left;
}
.menu-item {
display: block;
background-color: #adadad;
padding: 10px;
border: 1px solid #ccc;
}
.content {
padding: 20px;
}
.bottom {
background-color: aqua;
}
body{
margin: 0;
}
|
路由组件与一般组件
一般组件指以标签形式放置的组件,路由组件是以Route的参数形式定义的组件
规范项目结构中,一般组件放置于components目录中,路由组件放置于page目录
此外。一般组件默认不会带有props除非手动传,而路由组件会有三个默认props属性:history、location、match
自己封装路由组件
1
2
3
4
5
6
7
8
9
10
11
12
| import React, { Component } from 'react'
import { NavLink } from 'react-router-dom/cjs/react-router-dom.min'
export default class MyNavLink extends Component {
render() {
return (
<NavLink activeClassName="i-am-active" className="menu-item" to={this.props.to}>{this.props.children}</NavLink>
<NavLink activeClassName="i-am-active" className="menu-item" {...this.props}></NavLink>
)
}
}
|
1
| <MyNavLink to="/a">About</MyNavLink>
|
switch
一般情况下,Route会一直向下匹配,下面的例子中,如果不加外层的switch,B和Header两个组件都会在当前路由为/b的时候显示,但如果加上Switch组件包装,则从上往下匹配到后就不会继续向下匹配了
1
2
3
4
5
| <Switch>
<Route className="content" path="/a" component={A} />
<Route className="content" path="/b" component={B} />
<Route className="content" path="/b" component={Header} />
</Switch>
|
多级路由刷新相对路径影响样式问题
- public/index.html中使用
%PUBLIC_URL%开头的绝对路径(仅适用于脚手架)
- public/index.html中使用
/开头的绝对路径
- 使用HashRouter
路由精准匹配
默认情况下,请求路径为/home/a/v的请求也可以被Route/home所接受,称作模糊匹配,若要精准匹配,开启方式为添加一个exact属性:
1
| <Route exact className="content" path="/a" component={A} />
|
重定向
在以上所有route都没匹配到的时候,会有一个default组件称作Redirect
1
2
3
4
5
| <Switch>
<Route exact className="content" path="/a" component={A} />
<Route className="content" path="/b" component={B} />
<Redirect to="/a" />
</Switch>
|
嵌套路由
子路由需要在路由组件已经加载出来时才生效,且不能开启严格模式,
子路由必须以当前页面所在路由开头,否则会加载到别的路由上去,接着当前组件也会消失,从而导致当前组件上的路由无法匹配
1
2
3
4
5
6
7
8
9
10
11
12
| export default class B extends Component {
render() {
return (
<div className="content">
<MyNavLink to="/b/a">Go to A</MyNavLink>
<Switch>
<Route path="/b/a" component={Ba}></Route>
</Switch>
</div>
);
}
}
|
路由传参
路由替换
路由替换会将栈顶路由弹出后再压入,替换栈顶路由,方法为再Link上添加replace元素
1
| <MyNavLink replace to={{pathname: '/b/a/', state: {id:1}}}>Go to A</MyNavLink>
|
编程式路由
注意只有路由组件才有history
操作当前props的history
1
| this.props.history.push('/b/a/')
|
可携带state参数
1
| this.props.history.push('/b/a/',state)
|
可使用goBack、goForward、go实现前进后退
withRouter
可以将普通组件包装为路由组件
1
2
3
4
5
6
7
8
9
10
11
12
13
14
| import React, { Component } from 'react'
import { withRouter } from 'react-router-dom'
class Header extends Component {
render() {
return (
<div className="header" >
Header
<button onClick={()=>this.props.history.goBack()}>Click me</button>
</div>
)
}
}
export default withRouter(Header)
|
redux
用于组件间通信,需要安装redux
state为当前状态,action是一个对象,其中包括操作与操作参数
构造数据操作器
1
2
3
4
5
6
7
8
9
10
11
| export default function countReducer(state = 99, action) {
switch (action.type) {
case 'INCREMENT':
return state + action.data;
case 'DECREMENT':
return state - action.data;
default:
return state;
}
}
|
构造store,使用上方的数据操作器
1
2
3
| import { createStore } from "redux";
import countReducer from "./count_reducer";
export default createStore(countReducer);
|
获取值,从store中获取当前值
1
2
| import store from '../../../redux/store'
{store.getState()}
|
操作值,dispatch用于通知数据操作器要执行的操作
1
2
| import store from '../redux/store'
store.dispatch({type:'INCREMENT',data:1*1})
|
更新页面数据
1
2
3
| store.subscribe(() => {
})
|
:全局更新
1
2
3
4
5
6
7
8
9
10
11
12
13
| import React from'react';
import ReactDOM from'react-dom';
import App from './App';
import './index.css';
import { BrowserRouter,HashRouter } from 'react-router-dom';
import store from './redux/store';
ReactDOM.render(<BrowserRouter><App /></BrowserRouter>, document.getElementById('root'));
store.subscribe(() => {
ReactDOM.render(<BrowserRouter><App /></BrowserRouter>, document.getElementById('root'));
})
|
异步action
同步的action是一个对象,异步action是一个函数,需要安装redux-thunk
添加中间件
1
2
3
4
| import { createStore, applyMiddleware } from "redux";
import countReducer from "./count_reducer";
import { thunk } from "redux-thunk";
export default createStore(countReducer, applyMiddleware(thunk));
|
添加creater,返回一个函数,redux会传入dispatch
1
2
3
4
5
6
7
8
9
10
11
| export const createIncrementAsyncAction = (data,time) => {
return (dispatch)=>{
setTimeout(()=>{
dispatch({
type: "INCREMENT",
data: data
})
},time)
}
}
|
1
| store.dispatch(createIncrementAsyncAction(200,3000))
|
react-redux
- 不再需要强制渲染,使用redux容器封装原先容器会自动强制渲染
- 使用provider自动将store传给有需要的redux容器,供容器中的connect方法调用时使用
reducers
1
2
3
4
5
6
7
8
9
10
| const defaultState = []
export default function countReducer(state=defaultState, action) {
switch (action.type) {
case 'ADD_BOOK':
return [...state, action.data];
default:
return state;
}
}
|
1
2
3
4
5
6
7
8
9
10
| const defaultState = []
export default function countReducer(state=defaultState, action) {
switch (action.type) {
case 'ADD_PERSON':
return [...state, action.data];
default:
return state;
}
}
|
actionCreaters
1
2
3
4
5
6
| export const addBookActionCreater = (data) => {
return {
type: "ADD_BOOK",
data: data,
};
};
|
1
2
3
4
5
6
| export const addPersonActionCreater = (data) => {
return {
type: "ADD_PERSON",
data: data,
};
};
|
store
1
2
3
4
5
6
7
8
9
10
11
| import { combineReducers, createStore } from "redux";
import bookListReducer from "./reducers/Book";
import personListReducer from "./reducers/Person";
const allReducer = combineReducers({
bookList: bookListReducer,
personList: personListReducer
});
export default createStore(allReducer);
|
index
1
2
3
4
5
6
7
8
9
10
11
12
13
14
15
16
17
18
| import React from "react";
import ReactDOM from "react-dom";
import App from "./App";
import "./index.css";
import { BrowserRouter, HashRouter } from "react-router-dom";
import { Provider } from "react-redux";
import store from "./redux/store";
ReactDOM.render(
<Provider store={store}>
<BrowserRouter>
<App />
</BrowserRouter>
</Provider>,
document.getElementById("root")
);
|
Book组件
1
2
3
4
5
6
7
8
9
10
11
12
13
14
15
16
17
18
19
20
21
22
23
24
25
26
27
28
29
30
31
32
33
34
| import React, { Component } from "react";
import { connect } from "react-redux";
import { addBookActionCreater } from "../../redux/actions/Book";
import {nanoid} from 'nanoid';
class Book extends Component {
addBook = () => {
const name = this.bookName.value;
this.props.addBook({ bookName: name });
};
render() {
return (
<div>
<input ref={(o) => (this.bookName = o)} />
<button onClick={() => this.addBook()}>Add Book</button>
<br/>
总共有{this.props.personCount}个人分享以下书籍
<ul>
{this.props.bookList.map((p) => {
return ( <li key={nanoid()}>bookName: {p.bookName}</li>);
})}
</ul>
</div>
);
}
}
export default connect(
(state) => ({ bookList: state.bookList ,personCount: state.personList.length }),
{ addBook: addBookActionCreater }
)(Book);
|
Person组件
1
2
3
4
5
6
7
8
9
10
11
12
13
14
15
16
17
18
19
20
21
22
23
24
25
26
27
28
29
30
31
32
33
34
| import React, { Component } from "react";
import { connect } from "react-redux";
import { addPersonActionCreater } from "../../redux/actions/Person";
import {nanoid} from 'nanoid';
class Person extends Component {
addPerson = () => {
const name = this.personName.value;
this.props.addPerson({ personName: name });
};
render() {
return (
<div>
<input ref={(o) => (this.personName = o)} />
<button onClick={() => this.addPerson()}>Add Person</button>
<br/>
总共有{this.props.bookCount}本书为以下人提供
<ul>
{this.props.personList.map((p) => {
return <li key={nanoid()}>personName: {p.personName}</li>;
})}
</ul>
</div>
);
}
}
export default connect(
(state) => ({ personList: state.personList ,bookCount:state.bookList.length}),
{ addPerson: addPersonActionCreater }
)(Person);
|
setState其他写法
懒加载
使用lazy引入模块,同时需要设置loding组件,使用suspense组件将会懒加载的组件包裹并指定loding组件
1
2
3
4
5
6
7
8
9
10
11
12
|
import { lazy } from "react";
const Person = lazy(() => import("./component/Person/Person"));
const Book = lazy(() => import("./component/Book/Book"));
<Suspense fallback={<div>Loading...</div>}>
<Switch>
<Route path="/person" exact component={Person} />
<Route path="/book" exact component={Book} />
<Redirect to="/person" />
</Switch>
</Suspense>
|
useState
使得函数式组件可以操作state
useState函数会返回一个数组,第一个参数为state值,第二个参数为设置state的方法
1
2
3
4
5
6
7
8
9
10
11
12
13
14
| export default function FunctionComponent() {
const [count, setCount] = React.useState(0)
const [name, setName] = React.useState('')
return (
<div style={{border: '1px solid black'}}>
当前计数:{count}
<button onClick={() => setCount(count + 1)}>加1</button>
<button onClick={() => setCount(count => count - 1)}>减1</button>
<br />
当前名字:{name}
<input type="text" value={name} onChange={(e) => setName(e.target.value)} />
</div>
)
}
|
useEffect
用于模拟生命周期
useRef
用于在函数组件中生成ref容器
Fragment
当组件根节点使用,放置组件时,Fragment标签会消除
Context
用于父组件向子孙组件传递数据
PureComponent
用于避免不必要的render,重写了shoudUpdate,进行props和state的比较,如果与之前的状态有区别再进行render,但在比较时只进行浅对比,也就是只比较对象地址值,所以在setState时不要传入之前的state对象
插槽/renderProps
1
2
3
4
5
6
7
8
9
10
| <SlotComponent render={(val)=>{return <div>{val}</div>}}/>
export default function SlotComponent(props) {
return (
<div>
以下为插槽内容:<br/>
{props.render?props.render("hello"):null}
</div>
)
}
|
错误边界
将错误捕获并处理,避免影响全局,只能捕获后代组件生命周期的错误,不能捕获自己产生的错误和其他组件在合成事件或者定时器中产生的错误
使用getDerivedStateFromError配合componentDidCatch进行异常的捕获处理
Route6
- 移除了
<Switch>组件,改用<Routes>组件替代,且Route组件外必须包裹Routes
- Navigate组件,只要该组件被渲染,就会引起路由的切换,其带有replace属性,值为布尔类型,相当于操作history
- Route 新增caseSensitive属性,用于开启路由大小写敏感
1
2
3
4
5
6
7
8
9
10
11
12
13
14
15
16
17
18
19
20
| function App() {
return (
<div className="App">
{/* <Navigate to="/login" /> */}
<Link className="menu-item" to="/login">A</Link>
<Link className="menu-item" to="/register">B</Link>
<Routes >
<Route path="login" element={<Login />} />
<Route path="register" element={<Register />} />
</Routes>
<Navigate to="/login" />
=============或者=========================
<Routes >
<Route path="login" element={<Login />} />
<Route path="register" element={<Register />} />
<Route path="/" element={<Navigate to="/login" />} />
</Routes>
</div>
);
}
|
- 取消NavLink的activeClassName属性,改用通过回调函数的返回值设置
1
| <NavLink className={(active)=>active ? "menu-item active" : "menu-item"} to="/login">C</NavLink>
|
- useRoutes 通过对象数组生成Routes组件,可以将对象数组抽象出一个js
1
2
3
4
5
6
7
8
9
10
11
12
13
14
15
16
| function App() {
const elements = useRoutes([
{ path: "login", element: <Login /> },
{ path: "register", element: <Register /> },
{ path: "/", element: <Navigate to="/login" /> },
])
return (
<div className="App">
{/* <Navigate to="/login" /> */}
<Link className="menu-item" to="/login">A</Link>
<Link className="menu-item" to="/register">B</Link>
<NavLink className={(active)=>active ? "menu-item active" : "menu-item"} to="/login">C</NavLink>
{elements}
</div>
);
}
|
- 可通过路由表构建子路由,但在组件中需要通过Outlet组件声明当前组件的子路由展示区
1
2
3
4
5
6
7
8
9
10
11
12
13
14
15
16
17
18
19
20
21
22
23
24
25
26
27
| const elements = useRoutes([
{
path: "login",
element: <Login />,
children: [
{ path: "phoneLogin", element: <PhoneLogin /> },
{ path: "passwordLogin", element: <PasswordLogin /> },
],
},
]);
export default function Login() {
return (
<div>
Login
<Link to="/login/phoneLogin">phoneLogin</Link>
<Link to="/login/passwordLogin">passwordLogin</Link>
{/* 这里的Link中的to可以简写为如下 */}
<Link to="./phoneLogin">phoneLogin</Link>
<Link to="./passwordLogin">passwordLogin</Link>
{/* 或者 */}
<Link to="phoneLogin">phoneLogin</Link>
<Link to="passwordLogin">passwordLogin</Link>
{/* 使用<Outlet/>组件渲染子路由 */}
<Outlet/>
</div>
)
}
|
路由传参,多了几个hook
编程式路由,无需再将组件经过withRouter处理,可直接使用useNavigate
1
2
3
4
5
6
7
8
9
10
11
12
| const navigate = useNavigate();
const go = ()=>{
navigate('/login',{
replace: true,
state:{
id:123
}
})
}
navigate(1);
navigate(-1)
|
useInRouterContext
判断当前环境是否被Router包裹,也就是是否处于路由能控制的环境
useNavigationType
返回当前导航类型,返回值POP、PUSH、REPLACE,指是如何来到当前页面的,POP指直接访问当前地址或者刷新页面
useOutlet
用来呈现当前组件中要渲染的嵌套路由对象
useResolvedPath
给顶一个URL解析其中的path、search、hash值


